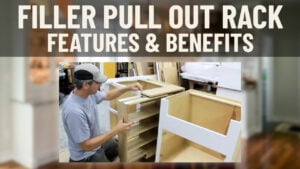
The Filler Pullout Rack is an incredibly useful addition to any kitchen! Used in both wall or base cabinets, this video covers either application. Also called a cabinet pull out rack or a cabinet spice rack, Brian goes through the process of assembling this cabinet between two adjacent cabinets. This unit comes in 3” or 6” variants and can be used in inset and overlay applications. A truly nifty and useful way to make some use of extra space as opposed to choosing an extended stile or a slightly larger wall or base cabinet. Feel free to reach out to your Cabinet Coach with any other questions!
Video Transcript
Introduction
Good morning, Cabinet Joint family. Brian from Cabinet Joint here at the shop at Rock Creek.
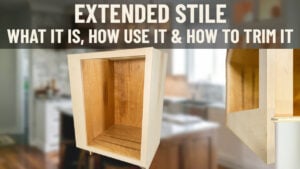
We’re shooting a video today on this handsome fella—it’s a filler pullout rack. These were pretty popular back in the day. They might have lost a little favor because of our ability to customize cabinet widths to any increment down to a sixteenth of an inch. This customization negates the need for fillers. That’s really what this rack replaced: a three- or six-inch filler or extended stile. Instead of being just a gap filler, you now have a pullout rack that slides in and out, offering some storage—say, next to a stove or near a stove.
These are available in three-inch and six-inch options. Here’s a three-inch version, and here’s a six-inch installed. We’ll show you how it goes in shortly. They’re available for base cabinets as well as wall cabinets. However, there’s no option for tall cabinets—only base or wall.
We’ll go over some differences between inset and overlay and discuss installation nuances. Stick with us as we walk through this! It can be a tricky piece to install if you’re not paying attention, so we want to highlight potential challenges during your three-inch versus six-inch filler pullout rack install.
Three-Inch and Six-Inch Rack Differences
Here’s the three-inch version. The primary difference with the three-inch rack is that you can’t get a matching panel. With the six-inch rack, I have enough real estate for four pieces of framing and a floating center panel. With the smaller three-inch rack, it has to be a slab.
Alternatively, you can opt for a plain slab between the cabinets without adding a door. However, this creates a void in the middle, which can look unfinished. Adding a matching edge profile to a slab or attaching a matching door gives a more complete look.
Tools & Materials
Before installation, let’s discuss tools and materials:
Tape measure and marking pencil.
Two screw guns or drill guns—one with a Phillips bit (or the correct head for your screws) and one for pre-drilling.
A drill bit (around 3/32 inches in diameter, but anything that works with your screws is fine).
Installation isn’t tool-intensive, but a second set of hands is helpful.
Preparation
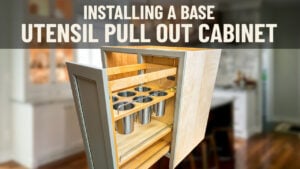
The rack comprises a top, back, and bottom piece, forming a sideways “U.” This U attaches to the cabinet sides, and the rack slides back in. Finally, you mount the door face to it.
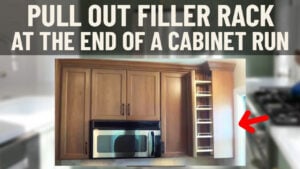
The racks are designed to go between cabinets. While they can be used at the end of a run with modifications (we have a separate video for that), they’re best supported between two cabinets secured to the floor (or to studs in the case of wall cabinets).
The racks come with a strip of wood that holds them together during shipping. We’ll remove it by unscrewing the two screws at the top and bottom. The screws used to mount the decorative door are also attached to this strip. Remove those as well.
Filler Pullout Rack Installation
Once the strip is removed, the rack can be separated from its frame. Fully extend the rack to reveal a small black arm at the top and two at the bottom. Squeeze these arms in opposite directions to release the rack. This leaves you with the frame, making it easier to handle.
If your cabinet doesn’t have an unfinished flush end, the front frame will extend 5/16 of an inch past the cabinet side. In this case, mount strips of wood to the back of the cabinet for support. These strips should be nominally a quarter-inch thick and extend to the back of the cabinet. Make sure the top and bottom are flush with the cabinet’s frame.
For overlay installation, align the frame with the back of the front frame. For inset installation, step the frame back by the thickness of your backer material.
Clamp the frame in place, drill pilot holes, and secure it with screws. Ensure the frame is parallel to avoid alignment issues.
Re-Inserting the Filler Pullout Rack
Reattach the rack by aligning the tracks and sliding it into place. Make adjustments to ensure smooth operation.
Attaching the Door
For overlay doors, ensure the door aligns with adjacent cabinet doors. Clamp the door in place, pre-drill holes, and attach screws. For inset doors, ensure the rack is stepped back to allow the door to sit flush with the cabinet frame.
Finished Product & Summary
Here’s the finished rack! It pulls in and out seamlessly and aligns with adjacent doors. The decorative door was attached by measuring the top of the frame to the rack and clamping it in place before securing it with screws.
Thanks for watching! We hope this video answered your questions about the filler pullout rack. Have a great day!