Video Transcript
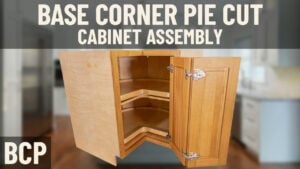
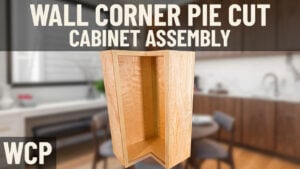
[Music] Hey everybody, Brian here from the Cabinet Joint. Uh, what I have next to me here is a base corner pie cut cabinet. If you’ve built any of our cabinets, you know that a base corner pie cut or a wall corner pie cut are two of the most difficult cabinets to build. Once you’ve built those cabinets, they’re not like any other standard square base or wall we offer; they’re a little more invasive on the assembly part. But once you’ve built them, your work is just beginning 'cuz now you have to mount these two doors together to give you this bifold and flip out of the way approach. You got to mount these two doors together and get them mounted inside the cabinet.
We get a lot of questions on just a standalone: how do I fit these up? I got these funky hinges; what do I do with them? That’s the purpose of this video. Um, you do have some considerations for overlay versus inset. We’ll get into that as part of the upfit video for this, um, by itself, but just be aware if you’ve got overlay or inset, your process is going to look a little bit different. So make sure you’re paying attention throughout this video. Let’s get started.
Okay, so you’ve built your lazy Susan cabinet. We’re going to make the assumptions your BCP or your wall CP, any pie cut cabinet, you’ve already got the cabinet case built, set off to the side. The purpose of this video is to show you, um, how to join the two doors together using the Blum hinge, how to mount your 170° hinges to the door that mounts to the cabinet box, and then how to snap that on to the base lazy or wall corner pie cut cabinet, um, and show you there is a little bit of a difference with overlay and inset.
With inset, you should have already snapped this bracket or screwed this bracket onto the back of the front frame before you built the cabinet; that would have been already attached to the frame so they’re waiting on the cabinet to have these hinges snap on, um, if you’re doing overlay, there’s no prep work done yet to the box.
You’re going to want to take a piece of 3/4 plywood, cut it into 2 and 1/2 by 3 in blocks—2 and 1/2 by 3 in blocks. You want two of those, and I’ll show you how these work in a minute. They’re going to tuck up behind the front frame, and then this bracket is going to screw to the side of the front frame for your, um, overlay hinge. So, I’ll show you that in a moment, but if you’re overlay, you do want to cut a couple of blocks 2 and 1/2 by 3 in out of 3/4 plywood. These do not come with the cabinets; that’s going to be something you’ll supply.
Terms of other tools and supplies you’re going to need, obviously, the 170 hinges which go on the cabinet box to the door. You’re going to get these hinges for the Blum that attach door too. I’ve got a square; you’re going to see how that gets used at a couple of points throughout the process. I’ve got the screws that came with the hinges, so just open up your little poly pack, and everything that came out of that, you’re going to want to use for these mounting operations.
I have a Phillips head screwdriver just to do fine adjustments with. Now, I never want to do fine adjustments with a drill driver 'cause it’s going to go too far too fast. You want to just do nice, um, uh, micro adjustments using a Philips head. And you got the two doors, uh, to emphasize, you should get two doors with the two doors—one’s going to have no prep, one’s going to have four holes, two full holes, and two partial holes. You’ll see how those come into play in a moment.
So, I’ve got my two doors, got my two drills, uh, one is got a collar on it. You can get these at Lowe’s for seven or eight bucks; it’s a centering bit. So when I push this into any of these holes, it’ll center the bit. I can’t move it around; I can’t get it out of placement. It’ll center the bit and run the hole for me, and it pre-defines the depth. I can’t over drill this through the front of the door. So, these are a really great tool if you’re going to do a lot of hinges on a job.
If you’re just doing one or two lines, you bought off vanity, you don’t got a lot of doors to do, you can just get a 33 seconds drill bit and just set the depth on that drill bit that you’re not going further than the depth of the door, which is 3/4 of an inch. So maybe set it for, you know, 1/2 inch or 5/8 of an inch tops, um, and just use that as your drill bit. Make sure you have it in the center of the hole before you run a screw, or you’ll pull the hinge out of alignment if you don’t have a dead center. So these are a very cheap investment.
I also have, um, Phillips head bit on my impact driver, and then here I have two pieces of plywood, 1/4 in and 3/4 in, and I’m stacking those up, just scrap stacking them up, and then some of the foam paper so that I can put my unboard door on top. So I have almost a stair-step arrangement here. I want this door to be an inch lower than this door, and you’ll see why when I go to put these together.
So once you have all these tools in your possession and you’re ready to move forward, we’ll get going with it.
Okay, so what we’re going to start with is joining the two doors together. So that means you can take these two 270° hinges and set them off to the side; won’t need them. We’re going to focus our attention on the pie cut—I call them the, um, bifold door hinges—that come with this little flat spot and the two brackets, the two plates. This hinge is going to end up going into this c-shaped slot; this whole full hole is going to get the 170s. We’re focusing on this c-shaped slot.
Before we drop this in and screw it in place, what I want to do is mount the bracket. So this bracket comes with a point, and it’s got these two little hooks. What I want to do is take the—there’s a little, um, receptacle for a barrel right there—and I’m going to take that, put it in, so my hinges now pivoting on that barrel, and then just snap it in place. Okay, that’s now one piece.
Now what I do is I drop my hinge into that hole. I move my doors into position so these two little barbs, these little hooks, are wrapping around the edge of the door. Now, before you start getting too exuberant and you drill holes and start screwing things in, what we want to do is get the top of the two doors as close together as possible. Really helps a straight edge—this is where a square or any kind of straight edge can come into play. I can just push the door down, whichever one, until the flat edge is hitting the surfaces of both the top and bottom. If you’re within a 30 second or a 16th, you’re fine 'cause there’s about an eighth or maybe even more than that, up and down adjustment. But if you start off with these two doors way off, you can’t adjust out that problem that you’ve just created, um, and you’d have to—you’d have to move these two holes down, then you got a problem. So you want to make sure your top and bottom are as close to dead even as you can get.
Now it’s as simple as taking my drill bit—hopefully, you have the collar; if not, just be very careful that you’re dead on the center of this hole down here—and you’re going to pre-drill that. Grab your screw gun and two of the screws that came in your hinge pack and snug those up.
Now, before I mount this, I want to slide this down to make sure I’m lined up still, do another check. I’m good, going to get my pre-drill again. I want to make sure I take my fingers and press this door and this hinge—again, I’m putting my thumbs on those barbs, press them so they’re nice and tight together—then holding it with my hand. Drill that and two more screws. Thank you, cameraman. And that one’s on.
I’m going to do the same thing down here, and then we’ll show you how to put these on, and then it’s off to the cabinet box to show you how they mount. You can follow along here if you’d like.
[Music] Okay, before I get into showing you how the 170° hinges mount here, let’s just quickly review your adjustability on these, um, Blum hinges. You have three screws: one here, one here, and one inside. Um, these are ideally adjusted with a Posidriv. You can see the diagram on the end of this Blum screwdriver; it’s very close to a Phillips head, um, screwdriver, but it’s got four little extra little flares on it. A Phillips head screwdriver will work, but this is the right screwdriver to get if you can get your hands on one.
Okay, I’m going to make the adjustments with this, but a Phillips head will work; we’ve used it in the shop lots. Let’s start with this screw here. This screw, as I turn it, what it does is it elongates this area, in effect, it’s pushing one door away from the other door. Okay, so when I turn it, you can almost see—should be able to see—this is going up, now it’s going down. So that’s your, I’ll call it, your inout adjustment, or your left-right adjustment, rather.
This one on here is pushing this door above and below this bracket, so it’s putting more distance between the bracket and the door. So we’ll call that inout adjustment. And this one, way down in here, is an up-down adjustment. So this bracket’s moving this way. You’d have to do both of these in the same, uh, relationship, and it will move one door up and down in relation to the other. So if you do have to dial out a little bit of a gap difference between these two doors on an inset application, it would be that interior, um, screw.
Okay, so you’ve got a bunch of screws to work with here to try to make things dial in just the way you want. Once you have the cabinet doors on the box, and we’ll show all that later. Now, what I want to draw your attention to is the 170° hinges; they snap in much the same way, and this is where my square comes in handy. I want to make sure because this one doesn’t have the straight edge on it like this one did, to hold it right to the edge of the door, this hinge can really be screwed on anywhere you want to put it. So you don’t want to accidentally get it cocked like that.
So you want to line it up. You can either do that visually by lining it up with the edge of the frame if it’s a five-piece door like this one is. If this was a slab, you’re really not sure if it’s straight or not. You can always take a straight edge like this, and you can run it—I can’t do it now with this door, I have a smaller square—but you can run it where this edge is on this, and this is following that, um, flat edge. Or you can also put both doors in and get a long straight edge like a level, and run the level on this plane and this plane, and push down 'cause that will automatically square these two up.
Okay, I have a perfect visual because I can see the framing of the door, and I can see if I’m straight, which is right about there. Now I can take my pre-drill, run my holes real quick, same on this one, and now I will just get my Philips head screw gun and fasten—oops—fasten these hinges on. [Music] [Music] Permanently.
Okay, so now to stand these up and show you what we’ve created. That’s what you’re going to see when you mount these; they have a little bit of a spring action, so these will actually snap the doors back against the cabinet, which the old sauce hinge did not do. So there is some tension in there, which is nice. These will mount to your brackets that are attached to the cabinet box; we’re going to show you in a minute, and then you can dial this all in. When you actually open a door, it’s going to swing all the way out of the way and against the adjacent run of cabinets, giving me full access to the inside of the cabinet. So we’ll show you all that now.
Okay, so now let’s show you how to snap the door onto the cabinet. Overlay and inset, you got some differences coming up, so let’s pay attention here. On inset, remember, I’ve already put the bracket on the inside of the front frame before I even built the box. So if I’m inset, this is why inset can be so nice. I’m just going to take these two—and I’ll show you this in a minute—take these two hinges, line them up on the barrel receivers there, and snap it on, and I’m pretty much done, except for putting my angled door stops on, which I’ll also show you in a minute.
If you’re overlay, there’s nothing done to the inside of this cabinet to receive these hinges yet. Okay, if that’s the case for you, what you’re going to want to do is your 170° hinges should have come with a bracket much like this one—not exactly like it’s going to have a little bit of a different stack here, maybe—should look a lot like this one, though. You’re going to actually put that on the hinge like that.
So, there’s a little barrel here, and then snap it on with the heel of your hand. And what you’re going to do is, you’re going to have to mount a block of wood to the inside of the cabinet where these hinges go. So, you should see a little video showing you now how that’s going to work. But these brackets are going to mount to that piece of wood, so you got to mount this piece of wood inside the cabinet where these hinges are going to reside.
So, let’s pretend I’m going to switch over here and pretend this—okay, this cabinet was a right-hand hinge. If I’m overlay, the hinge boards are always 3 in to the center of the door from the end of the door. So, the hinge cup is in here, 3 in to the center of that board. Well, my overlay is an inch here, but it’s full overlay at the bottom.
So, what I find to be the easiest is, I line up—assuming both of these hinges have these, um, brackets snapped on the back—I line up the door where I want it, right about there. And I find the bottom of the door, and that’s where my piece of plywood goes. So, I’m going to take my piece of plywood, tack it to the inside of the cabinet here, and wherever it goes here.
And now, when I wrap this hinge around and I mount it to my door, I got two holes that mount for the front frame, and then I’ve got the one hole at the stern that goes through the plywood. And now, I’ve got three points of contact: I got a screw here, I got a screw here, and here in the edge of the front frame, and I’ve got that screw anchored to the plywood.
Okay, so once I know where the top and bottom of this hinge go, I can pop this bracket back off—you just squeeze that little plunger there. Now, I can take this bracket back off and physically mount it. Now, I can go ahead and mount it where I know my holes are, and I can go ahead and screw that in with those three holes.
And now, follow the Snap-on procedure I’m about to show you. Okay, okay, now let’s show you how to snap this on. And again, the procedure is identical, whether you have the already located brackets here, or you’re using this plate for overlay like I demonstrated here. It’s the same exact snapping-in procedure.
There’s a barrel right here, like a little post, and there’s a little hook on the front of these brackets mounted to your cabinet.
I’m going to start with the top one, get this one out of the way. I hit the front frame, the top one. I’m just going to locate that post into that first little groove and snap it in place. So, top is now on. Now, I’m going to do the second one, fold my bottom hinge out, get it in, and snap it in place. And now, my door will fold out of the way, sweet as you please, and you’re good to go.
Okay, with inset, what I’ve got to do is put there four of these little L-shaped brackets. And I’m going to take the corresponding that come with the package of hinges, four of these little rubber bumpers. I’m going to put a rubber bumper on the front of all four of these, um, L-shaped brackets. And I’m going to have to have a bracket here, top and bottom. I’m going to have a bracket over here, top and bottom, so that the door doesn’t go all the way inside the cabinet and keep on going. I want it to stop at the front of the cabinet. And so, the way I do that is put this bracket where the front of that bumper is lined up with the back of the front frame. And once I have that location, I can make a mark with a pencil, and then two screws hold that one, same in the ceiling, same here, same here. And now, I’ve got four points of contact.
If you’re overlay, far far easier. If you’re overlay, just put a bumper here and a bumper here, all the corners of your door. So when I shut this, remember your overlay, your do up here, you’ll have a bumper touching all these places here to keep the door that eighth of an inch off. So, bumpers anywhere you have a point of contact on your front frame, except the hinge side, of course.
So that’s the last thing I’ve got to do. I’ll go ahead and do that, and then show you the finished product when I’m done with this inset job, and it’s pretty much ready to ship.
Okay, so I got my door snapped on, remember, um, and I—I misspoke earlier, it’s actually six of these brackets, just like you’d have six door bumpers on overlay. You have six of these little angle brackets because we don’t want the door going in too far here, too far here, or too far here. So I got a bracket, a bracket, a bracket, top and bottom. But now, when I shut this, you can see I’ve got good gapping top and bottom. If I want to dial that in, all that adjustment is here, as we spoke about. I got a hole here, a screw here, here, and here. And I’ve got the same screws on this hinge, so I can go up or down on the actual cabinet side or on the two doors themselves, in, out, left, right. And again, the goal is, with all those adjustments, is to dial in consistent gapping here, top and bottom, all the way around, and as good a gap as you can get in the middle. You will find that the gap in the middle is going to be larger than the surrounding gap out here, just the way it works out. So you can see into the cabinet a little bit, but that’s—that’s normal for these hinges.
Um, aside from that, your cabinet coach can answer any questions you might have. We do hope this video has been helpful. Get a lot of questions on how to fit up a Bas Lazy Susan cabinet because, or or wall Corner pie cut, base Corner pie cut, whatever, because of these funky hinges. So we hope this has been a help to you. Um, thanks for watching, everybody. [Music]