Video Transcript
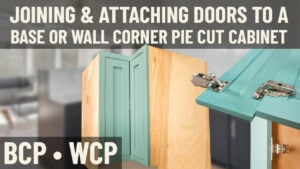
[Music] Hey everybody, Brian from Cabinet Joint here. Today's topic is the base. We used to call it a base Lazy Susan, now it's called a base Corner Pie Cut (BCP) cabinet. It's this monstrosity in front of me here. It's a two-man installation or assembly, I should say. You're going to want a second set of hands for sure on this cabinet, and it is one that I would plan on 45 minutes or an hour to build and fit up. Not the easiest cabinet. We typically tell people to save this till the end when you've kind of gotten a good flow with some standard walls and bases. Save this one until you understand the process and the program and are willing to put some time into it.
This is the first cabinet that has to be installed. You always start from your corners, so this cabinet is critical to be built. You don't want to wait too long. Lazy Susans are available or Corner Pie cuts are available with legs all the way up to 42 inches from 33 to 42 inches, so you have a big span in there where you can make this leg 42 and this one 36 if you wanted to, called an asymmetrical Susan. Standard out of the book, it's going to be 36 by 36 with two similarly sized doors. They always have this 170° hinge that allows these doors to fold almost flat against the adjacent cabinet. The hinges here, the ones that connect the doors here as well as one that connects to the cabinet, those are all adjustable, six-way in, out, up, down, left, right, so you have a lot of adjustability to get your gaps all dialed in.
Speaking of gaps for inset, when you shut the door, of course, you want to have consistent gaps all the way around. We do tell people if you're going to build this cabinet for an inset application, be aware you have two different front frames, you have a lot of racking because you got two different walls you're attaching the cabinet to, and it can get racked. You may fight these gaps. So if you're doing inset and you haven't yet purchased your cabinets, you're kind of shopping, I would personally recommend this be a diagonal corner cabinet, and you're just fighting one opening, and the door will square up perfectly. Whenever you have two doors hanging on one set of hinges with that racking factor, it can be really hard to dial this gap in. So be aware of that. Don't call your cabinet coach and say, "I can't get it perfect. It's almost touching here, and there's a gap up here." There's nothing we can do about that. That's not it was made wrong by the vendor or what have you. It's just that racking factor as well as some other things going on. So bear that in mind if you're doing inset.
Let's get into the assembly of this thing. It's going to be a long video, so buckle up. No way to make this one short, but we hope that with these tips, you can get this cabinet built without too much fuss. Okay, before we even get into the assembly of this base Corner Pie Cut, there's a couple of preliminary things we want to walk you through, and one is mounting any rotary Lazy Susans to the cabinet bottom and also to the shelf. Perhaps your base Corner Pie Cut was not ordered with Susans, but if you did order them with Susans, pay attention to this step. I want to show you how they go down, but before I even do that, if you have an asymmetrical Susan where one leg is bigger than the other, you've got to make sure you pull the proper panel because the top and bottom are mirror images of each other. You want to make sure you're mounting it to the proper panel that's going to act as your bottom. Alright, so what we typically do here in the shop to make it easy is we have carpet tape, it's just a double back tape. You'll see why this is kind of helpful in a minute. We just put one piece this way, stick another piece going the opposite direction to this Lazy Susan, and then what this does is act as a way to hold the bottom panel to the cabinet floor while I'm rotating the Susan to screw it down. You'll see in a second. Critical thing is you want to make sure you're lining up the back radius of this Susan. You want the pie cut perfectly in line with that, and you want the back corner to be out of the dovetail. We hold it about a half an inch off the edge of that dovetail so that the Susan can rotate freely. So, I'm going to call my partner Jeffrey here. We're going to usually make this a two-man job. He holds the front, I hold the back, and we try to push these as far back into the cabinet as we possibly can because how do you like where you are? I'm good. Good here. And I like Ryan. Then we just kind of push it down. The reason we want to push it as far back in as possible is in the case of inset, you have a big hinge hanging out right here. We don't want anything on the Susan or whatever to interfere with that hinge hanging back. So, we want to push these Susan as far back into the cabinet as we can. Now, that sticky tape is allowing me to now press down and spin this Susan without this panel here rotating on that slippery shelf. That kind of locks it in place so I can expose the four corners of that plywood plate. So, I'm going to grab four screws, an inch long, no longer than an inch because in the case of this, I have a half-inch thick bottom with a half-inch thick piece of plywood. It's nice to not have screws going through the bottom that I'm going to cut my hand on later. I just through one corner, I turn it till I expose the next corner, and I just work all the way around. This one's critical. You have it back off the back of the cabinet or the dovetails won't get together. This one is a shelf, and so you can get it a little closer to the back, but you don't want it hanging past. That's going to scrape the back of the cabinet, but this is just a free-floating shelf so it doesn't tuck right up against the cabinet back. So, I'm going to do the same thing off-camera, screw that down, then we're going to get set up and show you how the actual carcass goes together, the cabinet box itself. Stay tuned.
Okay, so now we're ready for our main installation. We set that shelf that had the rotary Susan on it, we set that off to the side. Make sure you or your partner make a mental note that has to go in before you put your cabinet backs on. Very, very crucial because you cannot fit those rotary Susans through the pie-cut opening and put them in after the fact. So, that shelf with the Susan attached must go into the cabinet before your back panels go on. So, you see, you'll see us do that in the video. Just make sure you don't forget. What we're going to do is start with tools. So, we have a typical staple gun with inch and a quarter staples. We
have a yellow glue. We have some blue tape, and we have an 8th-inch drill bit. We're going to set that up right here. Also, we're going to need our corner clamps. They're very crucial. This is what's going to keep everything square as we're nailing and screwing this thing together. The very first thing we're going to do is glue all the exposed edges of the top and bottom that you've cut out. So, if you haven't noticed yet, when you get your cabinet, the top and bottom are oversized, so you're going to have to rip them down to get them to fit into that pie-cut application. So, we're going to glue all the edges because we're about to screw this thing together. And once it's together, if you didn't glue the edges, they might want to start to delaminate over time. So, we're going to blue tape it to hold it in place. You got to be fast here. This stuff, the wood soaks up the glue, and it'll start to delaminate if you're not quick with this. I'm just putting it along the edge. So, let's do the other one real quick.
Alright, so with all the edges glued, I'm going to put a piece of blue tape right on the face so when we flip it, we don't have glue squeeze out onto our nice finished faces. Same thing on the bottom. Just throw a piece of tape across there. I'm going to bring in my friend Jeffrey. We're going to put this together. We're going to start with the top. We're going to do all our fastening. We're going to glue it up, fasten it, put some clamps on it, let it dry, and then come back and do the bottom. So, bear with us here. It's going to be a little bit of a process. You ready?
[Jeffrey] Ready.
[Brian] Alright, let's do this. I'm going to flip this over onto the edge. We're going to put glue along all the edges. We're going to take this piece, and we're going to put glue along all these edges. You want to hold that end for me?
[Jeffrey] Yeah.
[Brian] You good?
[Jeffrey] Yep.
[Brian] This is a messy, messy step. There's no way around it. The glue is critical. It's going to hold the pie cut together over time. And the thing is, you can't skimp on it. You've got to get all the way up against the edge because this is what's going to be holding this cabinet together. The staples are just to hold it together while the glue dries, but you need that glue to hold it long term. So, the other thing I'm going to do is just put a bead along that back corner. You never know if that back corner is going to want to delaminate. That's the place that's most likely to. Alright, so we got all our edges done. We're going to flip this thing over and we're going to start with these two edges first. You're going to push that corner in, and I'm going to push this corner in. We're going to check for square, and then we're going to put a staple right there. You ready?
[Jeffrey] Yep.
[Brian] So, I'm going to push it in. You're going to push your corner in. We're going to look for flush, and we're going to look for square. The way we do that is we look for that outside corner, and you can see we're touching there. So, I'm going to go ahead and put a staple in that corner. Okay, we're still square. I'm going to put another one up here. So, with our top two corners done, we're going to work on this back one. It's still a little off. So, I'm going to push in and down. Let's check our square. We're off again, so I'm going to push in and down. Try it again. That looks good. I'm going to put a couple more staples. Now, we're just going to go around and put some staples in all the way around the cabinet. Now, we're going to check for square one more time. If it's out, you can just grab this corner, push it out or pull it in until we get it right. That looks perfect. We're going to give it a few minutes to dry. Once that's dry, we're going to flip it over, do the bottom. Alright, now that we got our top fastened, glued, and clamped up, we're going to go ahead and flip this thing over. We're going to take our piece of tape off. We're going to go ahead and do the bottom. So, same exact process. We're going to put some glue along the edge, some glue along the face, and then flip it over and start stapling it. So, I'm going to do this edge real quick. I'm going to do the face. You want to grab that end?
[Jeffrey] Yeah.
[Brian] Alright. Just like that. Then we're going to do the same thing. We're going to push this corner in. We're going to look for square. Put a staple in it. So, I'm going to push mine in. You're going to push yours in. We're going to check for square. That looks pretty good. I'm going to put a staple in it. I'm going to go around and put some staples in the bottom. Then we're going to check for square one more time and give it a few minutes to dry. Alright, so we got all our staples in. We're going to check for square one more time. That looks perfect. So, we're going to give it a few minutes to dry, and then we're going to throw it on a dolly and take it over to the cabinet and screw it in. Be right back.
Alright, so we're over here at our cabinet. We're going to go ahead and throw the carcass in, but before we do that, we're going to throw in our rotary Susan shelf. I just wanted to show you real quick. You can see how close that Susan is to that hinge. So, if you were in inset, you would have that hinge hanging out, and it would really be in the way of this rotary Susan. So, if you're doing inset, make sure you get a diagonal corner, or else you're going to be fighting these gaps on the door. So, it's not an ideal setup for inset. Alright, so I'm going to throw this in. You want to come around and catch the backside of this, and we're going to do some screws through the sides. Here we go. Alright, so I'm going to hold it down while Jeff screws it in. Perfect. We'll do the same thing on the other side. Alright, now that we got the rotary Susan in, we're going to go ahead and throw the back on, and we're going to throw a couple of screws through the back. I always like to do the top and bottom first. That way, if it's going to flex one way or another
, it's going to do it now before we get all the screws in. So, we're going to throw a screw up here. Alright, that's good. Now, we're going to do the same thing at the bottom. Alright, so that's good. Now, we're just going to put a few in the middle. Now, we're going to throw our shelf in, throw our doors on, and we're going to be all set. So, we're going to throw this in. Slide it right in. Now, we're going to throw our doors on. We've got our hinges in. We're going to throw our adjustable shelves in. So, with our doors on and our shelves in, we're all set.
Jeffrey, I appreciate you helping out. I know you're not feeling well. So, if you could just do me a favor and clean up before you go, I'd appreciate it. Thanks for joining us, and I hope this video helped you with your rotary Susan installation.