Video Transcript
Hey everybody, Brian here from The Cabinet Joint today. Our topic is Base Double Entry cabinets. We're going to show you how to assemble it. Before I do that, I want to walk you through some of the basics about this box on the bases. These are available from 24 to 36 inches. When you get up into the higher sizes, you can get double doors with them. The 24-inch you can get a single door with it. They come in 31-and-a-half to 42-inch heights. So you got a lot of flexibility and variation there with your heights. The way these are typically used because of the double entry is either as an island piece, which is what this is a free-standing Island. These customers actually intend to cut the toe kick off. They want to put casters on the bottom. I believe and make this so movable island, but you can also use this on peninsulas. So if you have a seating area kind of eating kitchen or dining room, a living room, whatever, then you have the main kitchen, you can use this box as part of your peninsula going out, and put your drawer box pulling into the kitchen. And the false drawer is facing the non-workable area.
The thing with these you have to remember is typically, unless you're doing it as an island, one side of this is going to go against other cabinets, and it's going to be unfinished. You do have to make a decision on which side you want the drawer to pull out based on your finish. You can also get some options with this like any other cabinet, like the extension option flush toe to make it look more like furniture. Whatever suits you, Shelves on this are full depth. They're not three-quarter depth like Conestoga's typical bases. In this case, they go from the back of the frame to the back of the frame. So the shelf won't slide forward and back. So you're good there. Yeah, and you can put pullouts in it and those kinds of things if you want to get creative, but primarily these are just used as peninsula cabinets and the shelf.
So let's get into the assembly on this box. It is a little bit different because you're dealing with two front frames. This particular cabinet has 30-inch depth. So it's got some strange glides and some other things going on, but you'll get the idea of how this goes together. And if you have any questions, you can always call your cabinet coach.
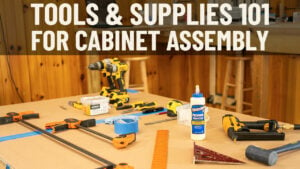
So let's get to it. Okay, everybody. Let's get started on this Base Double Entry assembly. Before I get going on the assembly itself. I just want to do a quick run-through of the tools that you're going to use and also what parts come with the cabinet. So pretty much all of our cabinets have the same tool list: a stapler engine and eight staples. We have our dead low hammer bottle of glue - type on two works great. We have a couple of clamps that I'll use on this assembly to hold the spreader strip on. You'll see that it acts as a nice second set of hands. A pencil, as always, is good. I just like to keep one in my ear, and then we have a wet rag for wiping out extra glue. Some other things might come up as you're going through the assembly: pair of pliers or whatever based on what you're running into, but that's pretty much the basics.
The cabinet itself: this is a Base Double Entry. So you're able to access the cabinet from both sides, which means it gets two front frames. You see, I got one on the table ready to go. And the other one's here. They're going to be both the same size front frames. I have two cabin sides. I have my cabinet bottom. I have my two spreader strips that act as the top of my two toe kick backers because I have two toe kicks to the Double Entry cabinet and these two little blocks that hold your false drawer front on. You'll see how these are used when I actually do that later in the assembly. These should ship with the cabinet, but every now and then, you'll find your blocks for false drawers, whether it be for a sink base or Base Double Entry. Sometimes you're packing your Hardware box ironically. So if you don't find them with the cabinet, hunt around your hardware box. Speaking of hardware, you're going to have door glide hinges and shelf pins that do not come in the box with the cabinet. So don't look for them there. There's always separate hardware boxes. It doesn't matter how big your job is with Conestoga. They pack all the hardware separately, all this weight and metal banging around inside the cabinet would surely damage things. So all this is packed separately. I'm gonna put the hinges in the shelf pins off the side. We're not going to use that for our assembly. The shelf glides we probably won't show that either, but these do mount a little bit differently than we show on our tandem install video. You will not use the L brackets on the back. So I probably will show a little bit on the door glides in a little bit after we're done with the box assembly.
Okay, you'll notice it's an unfinished frame. So we don't have any foam down. That's okay. It's unfinished. Every cabinet with Conestoga is the same. We're gonna have two shoulders that we're going to put glue on and then a deeper trough at the spline's going. We do not need to glue that if you're doing inset cabinetry. You want to jump to the video reference at the bottom of the screen right now, which will show you how to put your inset hinge brackets on and your drawer glide brackets. Ten text brackets before you assemble the cabinet is very, very critical if you're doing inset. You don't want to build the box until you put that hardware on. This is an overlay job. So I do not need to put it on, so go reference out of your instant, but we're overlaying so I'm gonna go right into my gluing, and I'm going to put glue on both shoulders nice crisp beads, if you can, and you don't need to use too much because it'll just make a smear you mess when you put the cabin side in it all Runs Out.
So both shoulders get a nice bead of glue. And then anywhere you have a cabinet panel contacting the frame, every horizontal rail is gonna have a groove in it. That does not mean it gets glue or a panel. We have a bottom, and we have our top spreader strips. This is nothing. So I'm only going to put glue on the outer edge of the top and bottom spline groove. We don't do the inner edge because then, when you put your panel in, it's just going to squeeze out or make a mess on the inside of the cabinet. Okay, so normally, if you've watched a lot of our assembly video and you sFtill can do it, we would start with a cabinet side in this case. I'm going to show you a trick. We have a situation where we have two flush sides. So it's a very deep cabinet, 30 inches deep or, I think, 27. These are really big sizes, and they want to fall over. I'm only one guy, so I want to show you a trick take your spreader strip finish side in, splines down, and line it up with the center of the dovetail in the center of the spline groove on this vertical. And push that in okay. Now what I can do is I can take my cabinet side and I can run my glue. Right here. Just a little bead with that thing's gonna go. and I put my cabinet side over that hanger cleat or that spreader strip rather. And down in get my dead blow. And now I've acted as a second set of hands where that cabinet side won't fall over. So I'm gonna do the exact same thing on the second cabinet side. So now I have both. I'm going to try to do this from this side of the cabinet. We're gonna run glue halfway up this dovetail. Not the full way to start at the bottom. All the dovetail just pushes the glue out. And again, make some mess. We're gonna go halfway. I'm gonna take my cabinet bottom. You have a finished side and an unfinished side. We want the finish side facing me in with the splines down. So you can see I'm going to disappear on you here, but you can see I just line up my dovetails, and that panel slides down. Get my mallet. And our intent is we want that gap at the bottom where this panel contacts the frame perfectly tight. We don't want any Gap there if we can help it.
And that looks good. Now I take my second hanger cleat which I keep on the hanger cleats spreader strip, and I insert it. I don't need to glue it yet. You'll see why in a second. I'm going to spin this around so you can see it's a beast of a cabinet, folks. They tell you, you know, I'm gonna come around to the front. All right, so once you have this down now, you can put your glue in up here. Just a little bit of glue there. And that spreader strip going to hang out for a minute because now what I have to do is prep my second frame and most cabinets. This is where your back is going to go on.
You'd be placing your cabinet back on, and this case. It's the second front frame. So I'm gonna go off camera here for a second put my glue on this frame the same way I did the first one and then put that frame on the box, and I'll come back to show you that. Okay, for my very astute viewers, you'll notice that I put that spreader strip in upside down because it gets splined in both directions going into the frame. I'm so used to cabinet backs where you don't get it. I had that reverse off-camera. I flipped it. I want my spline going into the frame so splines face the outside of the cabinet in both cases. I glued my frame up. I'm just going to lay this on here. Oh, yeah. This Plane wasn't in the way, and all I got to do now. I just used the palm of my hand. You don't need to use the hammer because you're hammering on the frame now.
I would just use my hands to try to get this to the seat. And I got a nice tight gap all along my flush ends. Those sides, if you want to, not a bad idea, if you have big case clamps as to run when you stand the cabinet up, is to clamp the two front frames top middle bottom and squeeze them together. So that's a pretty tight fit on my flush ends. I'm really happy with it.
Now. I'm going to squeeze this up. And those splines will go into that front frame the same as that one did, and this is where sometimes I will just use a clamp to hold that in until it sets off. This one, you kind of have the pressure of the cabinet going down, but we do these off and on our cabinets when we actually have to go through a nailer on the back cabinet back. The clamps are nice.
So that's the basic assembly. Now. I'm going to stand the cabinet up off camera and come back in a minute and show you how to put the sink false front blocks in. I'll explain that as well as the drawer runners because they go in a little bit differently than our tandem glide video shows. So stay tuned - I'll be right back.
Okay. Now that our basic cabinet carcass or box is built. Now, we have to move to the inside of the cabinet, and I wanted to describe why this is a little critical. First of all, remember your drawer box only operates from one of these two directions. It doesn't go both ways. So we have to figure out which directions are operable again on our particular box, both the size you're finished because the customers using it as an island. So because it's completely ascent or symmetrical, they can use it either way. So it doesn't matter to us. Let's say the L of your kitchen goes this way. This is your living room. This is your kitchen, and you want the drawer to open towards the kitchen that's going to be affected by. Put the level on the front of the front frame. And then get it level with your bubble, which I've done there, and then strike a pencil line across the bottom. The reason we do that is we're now going to take our drawer track. Put it in the opening. It's going to sit because we're overlaying here. Not inset. We're going to sit it right on the front frame and back it off. I think it's five thirty seconds of an inch. I made a line there for it. And then I'm going to get it level with that level line. I just struck a pencil line right there, and then we take our screws to come with our drawer glide pack. And we put one in. Now I can let that sit there for now. But now what I'll do is run a screw in here the front frame and one more in the middle, and now our door tracks are running parallel.
I can put my drawer in, and we're done. So that's really your final step now. It's putting on your door fronts, the false door front, which we have a video to show in our sink base video that shows you how to put that false door front on, but that's pretty much a done cabinet. So I'm gonna finish it up here and get it ready for the customer, but we appreciate you watching.
If you have any questions on Base Double Entry cabinets, give your sales rep a call 888-211-6482. Thanks for watching.