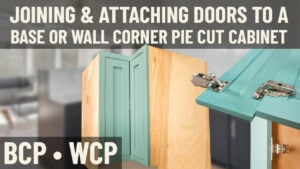
Installing Soss hinges onto doors for a base lazy susan cabinet

Video Transcript

All right, Brian here again and we're going to talk now about how to fit up your days for a lazy Susan cabinet. Before I get started with the doors we do want to note - it's a good place to note - that this foam, this white foam packing the comes with your doors and doors fronts, it's great to keep this on hand because you're going to use it to pad your work surface when you're working on unfinished product like your doors. Don't be in too much of a rush to run to the dumpster with that stuff. Keep it in the corner, or at least eight or ten sheets of it in the corner, and save it until the very end of your project.

All right, let's talk about these lazy Susan doors. Typically what we have is the doors are ordered with some slots cut in the spine of the door so that when the doors are joined together - let's stand these up and demonstrate. When the doors are joined together on your lazy Susan cabinet they can actually bend and twist and fold out of the way. We're going to show you how these two doors go together with the Soss hinge kit and then we'll show you how to mount the doors to the actual lazy Susan cabinet.

Critical point: when you start this off you want to get the faces of the doors, both tops ... If you have a cathedral door both cathedrals have to be up. Get the two doors and put them face to face very carefully. Just lay them face to face, and then lay them on the padded work surface so that your slots that I just showed you are facing up. Find your Soss hinge kit; there's two hinges that come in a plastic bag. They look like this and you can spread them apart like so. Find those hinges, cut open the bag, get your hinges ready. There's eight brass screws; you're going to need to have those as well.

Now what we're going to do is we're going to pre-drill. I'm going to take one of these Soss hinge kits, set it in the cup, press it in so it's flush with the work surface, grab our pre-drilled bit. We're using maybe the 3/32 bit here, just something to poke a hole. The screws are about 1-1/2" long so you don't want to be too loose on how far in you go. You want to give it a good plunge.

Then we're going to grab our other drill with the Phillips-head bit on it. Put one of our brass screws on the tip, which could be problematic because I don't know if they're magnetic. Then we're just going to drill this in very slowly and carefully. You might want to have your torque setting on so you don't break the screws off. I don't think that should happen but you don't want to over-screw them and end up with split wood or a broken screw.

You can see I'm kind of going corner to corner here. Just something I like to do. You don't have to do that. And our fourth screw. We're not going to bore you on the video showing you the other door or the other hinge, but you're going to do the same thing on the other one. Just repeat that process with the top part of the door and screw those on. Join us on our next video, or next part of this video, where we show you how to put it on the base cabinet.

Leave a Reply

Your email address will not be published. Required fields are marked *