Video Transcript
[Music] Hey everybody, Brian here from the Cabinet Joint. Today we're talking about this base two-door five-drawer cabinet and how to assemble it. Um, first thing you're going to notice is I said two-door five-drawer, but there's four doors. Typically, this cabinet comes with a door and a door, but you can do butt doors in it as it gets into its wider sizes which really makes it a four-door cabinet, but it's a two-door opening. Let's call it that, a two-door opening with five drawers, um, very powerful cabinet. CU you can accomplish a lot of storage with one big box instead of doing individual cabinets. You can establish a large platform of cabinets with one big box which is always less money for you than to buy individual cabinets to accomplish the same footprint. Um, few things to note about this cabinet: you cannot change the configuration, um, it comes as you see it with these openings, the door opening, the drawer openings, and this door opening all being the exact same width. So as the cabinet expands from its 48 in minimum minimum to its 96 in maximum these openings always stay equidistant or the same Dimension. You cannot tell your customer or your cabinet coach rather that you want to change the position of these midrails to make a wider drawer opening, for instance, can't do that, it's all equal openings. Um, the cabinet is available 48 to 96, 31 1/2 High to 34 1/2 High, both of those are in 16th-inch increments for width and height, um, when you go to depths it's going to be, um, 12 in deep all the way up to 30 in deep and 3in increments,
Okay, so it goes: 12, 15, 18, all the way up. That's a limitation of the drawer glides. As you get into this cabinet when you watch us doing the assembly, there are a couple of things to note. If you're doing a full overlay, this door here and this door here are going to require half-inch overlay hinges, not full overlay, because on a full overlay, your drawer is going to be sharing half an inch of the frame, and your door doesn't have the ability to fully overlay. So, in your hinge package or your hardware package, you're going to find half-inch overlay hinges, and those are going to go for this door and this door on a full overlay application.
For an inset application, pay attention to the assembly video because you're going to see us work through some assembly instances or issues that involve hardware for the carriers on these drawers. This is to dodge the internal vertical panel, because one thing I can't really show you, as it's closed, is that this cabinet does have fixed partitions behind here. So, you have shelves in here and drawers here, and there's a fixed partition that runs front to back, and it's dovetailed into the cabinet top and bottom. So, you're going to see us try to avoid some issues with some workarounds to handle the carriers on these drawers. This is very important for inset folks, and you're going to want to watch that part.
Okay, so let's get to the assembly itself and show you how this goes together. It's one of the tougher cabinets to assemble because you have these center partitions, and because it's just so big. So, you're going to want to have at least an extra body around to help you with sliding in the panels into the dovetails and so forth.
Even here in our shop, we always have two people on these cabinets. It's just too much risk of damage to do it by yourself, so let's get started.
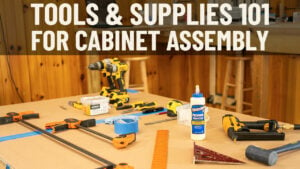
Okay, so before we get started with the assembly, I want to walk through some quick tools. If you check the description below, there's a video link to a full video that shows all the tools and supplies you might need for a cabinet assembly. I've got our basics here: a Bostitch stapler with inch-and-a-quarter staples, 5/16 staples, our Titebond II (any white wood glue would do), a rubber mallet, and you may need a clamp or two. We like to keep some of these clamps around, and you might need a clamp or two for your assembly. Also, a wet rag to wipe out your glue. I'm going to clear the deck here, and we're going to get started on the assembly.
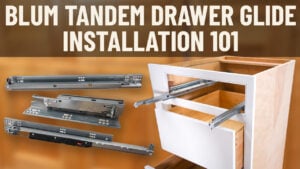
Okay, so before I get started on the assembly, if you notice, we've got brackets for door hinges and for our drawers on the back of this frame. I want to make some commentary on this before I actually build the box. If you're doing inset, reference the other video below about how to install your hardware for doors and drawer fronts on the back of your front frame before you assemble the box. Way, way easier. You'll be cursing if you build the box and then try to put these brackets on from behind the frame - not fun. So, if you're inset, go to that video. If you're overlay, all you really have to do is mount your rear brackets for your drawer Glides to your back panel with the pre-marked holes.
That's also referenced in our Bloom tandem video, but that's whether you're inset or overlay - you want to try to fit your cabinet back panel up with those angle brackets.
Now, this cabinet is different than a lot of other base cabinets we assemble because it does have two partition panels that are slotted. They're dovetailed in, and they die into the back of this front frame, and they're held in place by the dovetail slots on the cabinet top and bottom. You cannot change the position of those. Ideally, if the machining was right, they hit dead center on the back of this front frame. And what that's going to cause a problem with is you cannot put these beige Tandembox drawer carrier brackets here, or there's no room for that panel in the center. So, you're going to see a workaround here.
You're probably wondering, "Well, why didn't you put the beige brackets in here? They won't fit." We have to actually carry the drawer glide on the cabinet inner wall by flushing it out with some blocks of plywood that we made. These blocks of plywood are not supplied, so you're going to want to run to Lowe's and get some 1/2-inch plywood. Your cabinet coach can order you some if you need it, but it's much cheaper to go to Lowe's and get some 1/2-inch plywood of any kind and make some blocks. And we'll show you, after the assembly is done, how these go in and how they're used. So, because I can't fit any hardware there or all along here because of that panel, we have to do a workaround. You're also going to fight - not fight, but these two. Most of these time, these cabinets, these B2D5Ds, you have doors that open out on the really wide ones, like this one. You're going to have double doors that are butt, so you're going to have a set of hinges on the inside as well. This set of hinges barely misses that piece of plywood. You may actually have to kind of poke the piece of plywood as you're assembling it to get it to clear the hinge, so you'll probably see that during the assembly as well.
Alright, I'm going to start up like we always do. I'm going to get our glue, and I'm going to go around the cabinet and I'm going to glue these two shoulders on both the left and right right style. I'm going to glue this where the cabinet bottom comes down, and I'm going to glue there where the cabinet top comes down. And I'm not going to bother gluing here because these panels are held in place, and they can float behind this front frame that's all finished anyway, so you're not going to get a good glue bond. So, don't worry about that. I'm going to get started on gluing and show you how this looks when I'm done.
Alright, so I got my glue on the left and right shoulder, bottom, and top. Now, I'm going to get my side panels. We have two of them. You'll note that one of them has a cutout for the toe kick, and the other one does not. This cabinet is a little - not strange, but we have an option called a furniture leg or extended leg option, so the customer is having this piece of front frame come down to the floor. So, that's the one that's going to get my full, uncut back for the toe kick area.
We line up the cabinet bottom with the bottom of the frame, just kind of press that into place. Do the same thing with my other side, tap that into place, and now we're ready for the cabinet top and bottom.
What we're going to do is take our glue, and starting in the middle of the dovetail, I'm going to put a bead of glue, and the dovetail action will smear that all the way through the joint for us. Okay, we grab our top and bottom, and I'm going to ask for some assistance. Jeffrey, would you help me on these larger cabinets? It helps to have a second set of hands, one guy on each dovetail. And once you get them lined up, just kind of press it into place.
That was my bad - we have a problem over here, actually. We do, yeah, we got to get that spline out of the way. Oh, I can move that over. Jeffrey is making a good observation, and that is, every now and then, the splines here - sometimes they're so far outside, they're going to hit the front frame.
Okay, you just got to kind of take a screwdriver and move the spline down a little bit.
Alright, going to do the same thing with the top. Ready, line up our dovetail. Oh, your spline's good. Yeah, and these tops can have a little bit of a warp to them because they're so large, so we might just have to bend it in the middle to get it to line up.
Okay, I'm going to tip this forward to show you - these panels have slots for the partitions, top and bottom. So, we're going to take our glue, and once again, do halfway down the dovetail. The partitions are finished on both sides - you've got a butt edge that goes to the back, and I'll have to seat that one. This is what I was telling you - you've got to get them to miss the hinges.
Okay, so to summarize where we're at - we put our top and bottom in. Again, you're going to want a person on each end, they're a little tough to fight. And then I put these center partitions in. A note on these - you want to make sure, and I'll try to get a closeup for you, but the rear shelf holes should be like an inch and a half from the cabinet back. The front shelf holes are about 6 inches back from the front of the cabinet. It's very easy to get those reversed, then your shelf holes won't line up. So, make sure you have your panels set so that the shelf holes in the back are like an inch and a half from the rear.
One thing I wanted to comment on - you have two panels running this way, they do not have those pre-marked, so we just put a little pencil line where the center of those panels were, and then you can just grab a straight edge, any old straight edge you want.
Alright, let's connect the dots and make your own scribe line.
Now, we're going to put our cabinet back on, and I want to glue this vertical surface here. So, I've got the butt edge of this back panel going to touch that unfinished surface, and then I'm going to do anywhere the cabinet back is going to contact, so all of this. I'm going to go ahead and run the glue there, and then I'll have Jeffrey come back on screen and help me with putting the back on.
Alright, Jeffrey and I are going to lower the back on. One quick point about putting these down - I cleared the hinge brackets inside, no problem. Again, like I mentioned before, if you're kind of hitting the hinge bracket, just kind of tap the panel down here, it'll go around the hinge bracket if you happen to be doing inset.
Alright, Jeffrey, come on screen and give me a hand. Let's get this label off of here - easier to peel off now than later.
Okay, now on these panels, you've got to make sure you have the drawer glides oriented right. It's easy to get this panel flipped upside down. We have the three sets of drawers with our top drawers, make sure you keep that facing up. If you install this panel upside down, none of those brackets will work.
Alright, here is where you've got to have a rubber mallet. You're going to go all along this nail line where these holes are, and you're going to pound that down, top and bottom, to make sure that it's seated really well. You can hear when it drops down - you can hear that panel seat.
As I mentioned, every 5 inches, you have a little pre-marked hole. That's not a screw hole, that's just an indicator line. You're going to nail or staple on either side of all those holes, top and bottom. Now, we'll go down our cabinet sides and show you how to do that. So, you get your staple gun and just go on either side. You can now just go along that pencil line and put a couple of staples in to hold her in place.
Okay, now on the cabinet sides, grab my pencil again. You have your back panel, and you want to put a pin right in the center of that back panel, all along the side. These are not pre-marked, you'll want to just line your pencil up with the center, and using a straight edge or your finger, just make a pencil line. Same thing on this one.
And all we're going to do is go along that side and staple every 3 inches, right where that line is. Now, a point of note - if this is a finished side, I'm going to demonstrate on the other cabinet side what to do if your cabinet side happens to be finished, because you can't run a staple through your finished side.
Alright, so let me staple this in the right way real quick, and then I'll show you the flush-end way if you happen to have a finished end. What you're going to do is disconnect your air - very important step. You're going to pull this little plastic bumper off the gun. All that really does is protect the finished surface, but you don't have a finished surface to protect. And now, what we're going to do is reconnect our air, and you're going to take the gun, and keeping the heel of the gun on the panel, push it all the way up into the corner, and then drive your staple in. And that'll toe-nail the staple in at an angle into the cabinet side, like so. Then you can disconnect your air and put your bumper back on. That will allow the gun - taking the bumper off allows the gun to get all the way into this angle as close as you can, so that the staples don't want to work themselves through the finished veneer on the inside.
Alright, so our cabinet carcass or box is built. We got staples where we want them, top, bottom, the center partitions if you decide you want to staple those, and our outer edge. Now, I'm going to ask Jeffrey to come back on screen, and we're going to stand this up and show you what the inside looks like, and then wipe out any excess glue.
Okay, our box is built, looks pretty good. We have a little glue on the inside, I'm going to wipe that out, making sure our drawer glide brackets are installed right. Any glue on the front frame, if you happen to get any on from when you were laying your panel down, make sure you wipe your frames down good.
Okay, once that glue sets up on a finished surface, it's not terribly easy to get off. Aside from that, we have a pretty well-done box. Once I wipe the glue out, I'm going to come back on and show you how we block out for these hinges or glide rails, rather, like I was telling you earlier. I'll show you how we did that.
Alright, let me get you a little closeup of what's going on with these drawers. Again, if you can get some 1/2-inch stock from Lowe's or Home Depot, make sure it's quality stuff, not the CDX that you use outside. It needs to be a full 1/2-inch because you're flushing out the front frame to that cabinet wall, so you want it pretty much dead flush with that front frame. Again, not supplied by Koga, you can cut either chunks or you can cut one long strip. We didn't have one long strip, so we just cut chunks. It won't matter because it's drawers, you won't see it.
But now you can see, we pinned it to the inside. You can use pins or screws, just realize this is 1/2-inch, and the cabinet wall is 1/2-inch, so whatever you use, you don't want it to be longer than about 7/8 to an inch max. And we just braid ours to the inside of the cabinet wall. Same thing on this one over here, which I've already done for you.
So, this one's hanging from the beige bracket, this one's mounted to the piece of plywood, just like that. And I want to show you what that looks like. You'll slide the drawer glide in, and you're going to make the front of this drawer glide about 7/8 of an inch back from the front frame, which is going to mirror this one.
Okay, we already know from our Tandem video where to set these pretty close, but they're adjustable. What you want to make sure you do is, there's an elongated hole right here, like a keyhole slot. Make sure you use that as your screw hole until you get your drawer adjustment right.
So, drive your screw in where this is level with the front frame. You're in that elongated hole, you're 7/8 of an inch back, and you can fit all these drawers up that way. And then, once you put your drawer in for inset, if you're too far in, you can just loosen these screws up and pull them forward a little bit. If you're too far out, you can push them in a little bit.
So, just run an elongated screw, and once you have them where you want, put a second screw anywhere in any of these holes here. Put a second screw in, because you're carrying the weight of the drawer box by these two glides, you want to make sure you have it well supported with two screws in each glide. And that's kind of the big difference with inset, dealing with these B2D5Ds. If this was overlay, this wouldn't be an issue. Your tracks would sit on the front frame like overlay does, your tracks would sit right there, and you wouldn't have any of this interference stuff. So, it's only on inset that I'm showing you this blocking.
Another point I want to make is, there is a desire sometimes by customers to just leave these panels out altogether and just say, "Ah, you know what, I don't want to fight with that. I'm just going to mount my beige brackets on both sides and leave the panel out." If you choose to not put that panel in, first of all, you're going to have a slot top and bottom. The bigger issue is, you have a ton of weight wanting to pull this cabinet apart because these are dovetailed in.Those dovetailed panels are actually keeping the top and bottom parallel. And if you put a lot of weight in the bottom of this cabinet, and that bottom panel wants to flex, and it does not have these two dovetailed panels to hold it tight, the bottom will flex and take the front frame with it, and you'll end up with cracks in your front frame. So, resist the urge to not use those panels, just to make your assembly easier. Put the panels in and do the blocking method we're showing you here, or something similar. Again, you just got to get the panel to flush out, whatever you however you want to do that, but 1/2-inch plywood works for us.
So, that's the finished assembly for a B2D5D, a very powerful cabinet. We've had customers who have taken this and made all three openings drawers, and they're all equal opening. Your cabinet coach would work with you on a custom front frame to do that. Super powerful cabinets that go all the way up to 8 feet wide, so very, very powerful in your design repertoire.
Thanks for watching!