Video Transcript
Introduction
It's a glorious day here at Cabinet Joint. I'm Justin, and in today's video, we are going to be assembling a base integrated under-counter microwave cabinet. Now, essentially, the job of this cabinet is to take your microwave off of your wall or off of your countertop and stick it into a base cabinet. For this customer, they're going to be doing it in an island. The other part of it is it creates some storage underneath. You have a drawer right here, creating a nice, sleek spot for you to put your microwave. It's a really clean look. This is an integrated cabinet, and basically, what that means is this has an extra spacer here on both sides on the style, and that is going to make a more clean, sleeker, complete look. But there's also a base under-counter microwave cabinet that does not have these extra spacers, and essentially, there's just a little bit more of a gap there that you'll see around your microwave. So talk to your cabinet coach, get the specs on your microwave, and figure out which option is better for you. If you want to know more features and benefits, we have a separate video dedicated to that. The link for that video will be in the description. Whether your microwave cabinet is integrated with this added spacer on the style here or not, you can go ahead and follow this video. The assembly is going to be the exact same. Now, with that being said, I think we're ready to look at the tools and get this build started.
Tools, Supplies, & Prep
The tools you are going to need for this build are:
A drill with a drill bit that's just a little bit smaller than an eighth of an inch.
A screw gun with a Phillips head, one with a T15 Torx head, and then a square drive.
A screwdriver with a Phillips head.
A pencil.
Measuring tape.
Rubber mallet or a dead blow hammer.
Some Typon 2 wood glue.
And lastly, the Cabinet Joint Inset Scribe Jig.
We'll be using this to scribe lines on our cabinet sides for staple purposes and then also to locate screws to attach our drawer fronts.
The key point to building this is to make sure that you get all of your inset hardware installed pre-assembly because once you put your fixed floor kit in, it's going to be near impossible to be able to reach back into the cabinet and make adjustments or install your back brackets or even these face frame brackets for your drawer glides. With that being said, let's get into making the cabinet.
Base Integrated Under Counter Microwave Cabinet Assembly (BIUCM or BUCM)
First, because this is an inset job, we have some preliminary steps that we need to take to just simply make our lives easier. The first thing is we need to locate the back bracket for our drawer slide. I am using the front frame as a template method that you can find in our "Locating a Rear Bracket Without Pilot Holes" video. The link is in the description. So once I have the pencil marks out, I go ahead and screw those back brackets in.
So now that we have that back bracket installed, we can go ahead and flip the front frame over and install the little brown brackets that we have here in the bottom corner of the front frame. Then, once we put those screws in, we can go ahead and start building the box of our cabinet.
So this build is very similar to any other base cabinet build, except now it has a fixed floor kit, which you'll see here in a second. So I'm using Typon 2, and I'm going to glue around the grooves. I'm going to glue the top and the bottom rail, and I'm also going to put glue on that center rail because, once again, this is a fixed floor kit. So you'll see there's essentially a middle shelf that it's going to slide into here. Once I have the glue in, I can go ahead and install both of the sides. And once I have the sides installed, I'm going to put glue halfway up the dovetail groove there. Once again, I'm putting it only halfway up because, as I slide the bottom and the top in, that glue is just going to smear all throughout that groove.
So now that I have the top and the bottom in, I'm going to slide in the fixed floor kit. So we're going to slide in the shelf. So you notice the shelf has splines on the front, so that is going to slide right into the groove there in the center rail. Then you'll notice that this piece looks like the top and the bottom, except it doesn't have the dovetail groove on the side. So, in order to compensate for that, we are going to square up this shelf, and we're going to put one staple in to hold it there.
It's important to note I am using inch-long staples here because if I use inch and a quarter, it's the exact size of the material. So then it's going to splinter out. Then, I'm going to take a 3/4 piece of plywood, and you'll notice that one side is edge-banded. That edge-banded side is going to want to go down. That is going to be the side that, if you were to see it, you'd want to see the edge band.
I'm going to put a staple in the bottom, and then I'm going to put a staple in the top just to hold it. Then I'm going to go on the outside of the cabinet and just pucker it with staples. I'm going to put a lot of staples in because this is what's going to be holding the weight of the microwave.
Then I'm going to go over to the other side, do the exact same thing, take my speed square and square up the shelf, tack it in with a staple, and then put the cleat in. Once again, with the edge band facing down, tack this side square as well. Then I'm going to shoot a bunch of staples here into the side of the cleat.
Now that my top and bottom are in, and that my fixed floor kit is in, I'm going to put a mark on the back of the side at the center of where the shelf is. That way, once I put the back in, I can connect those dots and know where to staple then into the fixed floor kit.
So now, I'm going to go ahead and glue the sides and the top and the bottom, but notice here, very important, I don't glue the back of the fixed floor kit simply because there's no groove on your cabinet back in order for that to go into. So the glue would then be going onto a finished veneer, and you know that is not a very good adhesion point at all, and it just smears and makes a mess everywhere. So, I'm avoiding gluing the back of that middle shelf there.
So now that everything's glued up, I can go ahead and install the back of the cabinet box, and I'm going to use my mallet to pound the back onto those grooves that are there for the top and bottom. Then, I'm going to go ahead and switch to inch and a quarter staples, and I'm then going to staple the back onto the top and the bottom using the pre-board holes as a reference for where to staple.
Then, once I have my top and bottom stapled, I'm going to connect the dots that I made on the back of the cabinet sides. I have a framing square here. You can use any straight edge that you want and simply connect the pencil marks that we made on the back of the sides. Then, that will give you a point of reference of where to nail into to catch that middle shelf.
Now, be careful as you're nailing that you're nailing straight, and you're not nailing at an angle, because then you might have some staples that pop out through your inside of your cabinet.
Now that the top, bottom, and middle shelf are stapled, we can go ahead and use our Cabinet Joint Inset Scribe Jig, make a line on the cabinet side here. If you don't have our scribe jig, you can simply use a tape or a pencil. That mark is going to be 1/2 inch down from the back of that side there, and that's going to be where you want to staple so that you are stapling directly into the center of your cabinet back.
Now that my cabinet box is assembled, I'm going to place it in the upright position, wipe any glue squeeze-out that I might have inside the cabinet with a wet rag, and now that all the glue is cleaned up, I'm actually going to put the cabinet on its back and install the toe kick backer.
To install the toe kick backer on a cabinet like this with one extension leg, I go ahead and install first on the side without the extension leg that has the cutout. I go ahead and staple it into that side there. To save time, you could measure; it would be 2 and 3/8 inches from the back of the leg there, but instead, I'm just gonna eyeball even spacing from the back of the face frame, and I'm just going to staple it in from the side.
So now, I'm going to set the box to the side, and I'm going to take my drawer box. On the bottom of the drawer box, you see those pre-drilled holes. You're going to take your Blum undermount clips and install those onto the bottom of your drawer box. Then, once you have those four screws put in, I'm going to go ahead and grab my drawer front. I'm going to put that on its face.
Then, on the back of the drawer front, I am measuring 1/2 inch from the bottom on both ends, and then I'm going to take my drawer box, put it on top of the drawer front, even up the sides, and then I am going to line up the bottom of my drawer box with those marks that I previously made. Once I have it where I like it, I'm going to use my jig and my center punch to mark out where I'm going to drill. You can also use a pencil. The center punch is just nice because it creates a little dimple so that way your drill bit doesn't run off.
If you don't have a jig, it is 1 inch in from the side and 1 inch in from the top or the bottom. So then I am ready to drill the holes. I am using a bit stop on my drill, but you can also use blue tape or some other method that you have just to make sure that you don't bust through the front of your drawer front.
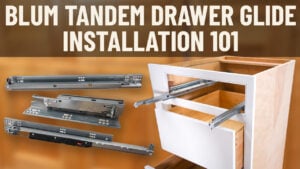
Now that those are drilled out, I'm going to take my 1 and 1/4 GRK cabinet screw and fasten the drawer front to my drawer box. I'm going to go ahead and put that to the side, take back out my cabinet, and I'm going to install the Blum undermount glides.
Now, as I'm installing, it simply just slides into the back bracket. I am using the machine screw that will come in the bag with the brown brackets and find the little hole that's there and screw the glide into this bracket. The front edge of the glide is just on the edge of that opening, which you can see a close-up here.
To get more information on installing any of the inset hardware, we have an entire video dedicated to that, and the video link will be in the description. So, once those machine screws are tightened and located where we like it, I'm going to pull those glides all the way out just to make it easier to install the drawer.
I'm going to rest the drawer on them and push it back. Wait for that click. Now that it is clicked in, I know that my drawer is engaged, and my drawer is in. And basically, adjust until all the margins are right. If you look, I need to move it to the left a bit, and I also need to move it up. So, I'm going to use the undermount clips in order to get that adjustment, and now we have a completely built cabinet.
Now, you might be looking at the top and saying, "Wait, we have done nothing there. The top is completely open. That's where the microwave is going to be installed."
The Finished Product & Summary
So now your cabinet is complete, and now you can see it's a pretty simple cabinet to build. The biggest thing you want to watch out for is make sure, if yours is an inset job, to install all of the inset hardware prior to assembling your box, because otherwise, with this fixed floor kit in here, it's going to be really difficult to get back in there, install the back brackets, and then the front frame brackets here as well.
Now, once again, reminder that this is the integrated cabinet, so you have this spacer here, and it helps just create a more custom, seamless look to go around your microwave. This is a great option. It helps get your microwave off of the countertop, and it is a great way to integrate your microwave into an island or into another base cabinet like this customer is going to do.
So, make sure you are in contact with your cabinet coach and clarify and figure out all the specs for your microwave if you want to have a cabinet like this. So, if you have any further questions on this cabinet, you can go ahead and reach out to your cabinet coach, or you can call us at 888-211-6482. Thank you guys for watching, have a great day!