Video Transcript
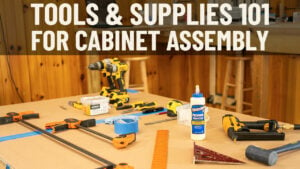
[Music] Hey, Brian from Cabinet Joint. Um, we've often talked about assembly, but what we don't get into a lot is what you have to do before you actually start building your box. We're pretty big on making sure you're organized and your cabinets are all sorted, and you've got your front frames with your cabinets if it's an inset job and all that. You've seen that in some other videos that you should have received as part of the welcome series. But we want to also talk about hardware because when you go to build the cabinet, it's nice to be able to reach and grab the drawer glides and the screws and hinges, whatever it is you need to fit up the cabinet because there's a lot of bag opening.
So what we typically do, you can use Solo cups, you can use Tupperware, whatever. We have some bins here that have labels facing you, and for the hardware, we have several versions. One is the beige tentex brackets that are used to hold your drawer glides to the back of the front frame if it's an inset job. So these are only for inset. Then you have two versions of hinges, either overlay or inset, and they come with slightly different hardware, so I'll talk about that. And then you have the drawer glide packs that come with the rear brackets, the little orange release clips, the glide rails themselves. So let me just show you how we organize. This is one of the first things we do in the breaking down of the job when a job arrives here at our shop in Gettysburg.
We immediately do the sorting process for the cabinet components and get them all racked and binned. Then we take care of our hardware sorting, and then we start building our cabinets. We know exactly what we're building when we grab a cabinet. We grab the hardware we need. It makes this so much more efficient. So let's get started.
Let's pretend you ordered inset. You have these 10ex brackets in the box. You should have two beige brackets. Okay, you can set those in a box or wherever you want to put them. Then you have some hardware. What you're going to get is four, and we'll have pictures of these for you, four of these kind of bronze-colored Phillips head screws. We put those in one bin, and we have two machine screws. These machine screws are what hold the glide rail to the tentex bracket with a little adjustment mechanism. We'll show you how those go in when you actually watch the video for how to put your platinum hardware in, but put the machine screws in their own bin or cup.
Then we have these four other screws. We don't even use these, or either optional or unnecessary in our minds because those screws go way into the front frame and support hundreds of pounds. These are additional screws we just kind of throw them away. You can keep them for something else.
Now we move on to our hinges. I'm going to do the inset hinges first. You're going to get the hinge bodies. I'm going to get the hinge bodies themselves. You get the two angle brackets, and again, you can throw those in their own box or just get them out of the way somewhere. Then you have all this hardware.
First of all, you get two little angle brackets that look like this. These are your bumpers for inset. Again, we're doing inset hinges. These are your bumpers that your doors rest against for inset. We have a bin for those, and there's two little rubber pads that go on those, so we put that in the same cup or the same bin. Then we have the actual big, they got a big fat head on them, Phillips head. There's four of those, and these are what hold the hinge bracket to the back of your front frame. So we put those in the hinge cup, hinge screw cup. And now we have a bunch of medium-sized screws. Four of them. Those four medium screws are what hold the actual hinges to your door in those holes. So those four medium screws go in the medium screw cup, which I think is that one. And then we have two little screws, or we call them small screws. These are used to hold these brackets to the cabinet floor, so you can throw those in there. If you were doing an overlay, it's much the same as the inset. The only difference is you get a little less hardware.
Whoops, you have the two hinge bodies. You can set them down. Then you have the two big screws that hold—oops—that hold the hinge to the front frame right through that hole there. So those are the same exact screws we had with inset, except there were four of them. Now you have one per hinge. And then we have four—we don't get the little screws or the bumpers 'cause these are overlay. The doors lay on the front frame. We got four of the medium screws will go in there, and those are what hold the hinge to the door itself through those holes there.
Okay, so we're getting sorted. We know exactly what hardware to grab as we need it. Now we have some trash here. Now we have the glide rails, and every glide pack comes with basically what you're seeing here. You got a left and right orange clip. These are the little release handles that go on the bottom of your drawer box. You get two rear angle brackets, and these are the brackets that mount to the back of the cabinet and the drawer glide sits on that. And that's what carries this at the back of the cabinet, and the front of the drawer glide either is held by the front frame for overlay or it mounts to this tentex bracket if it's inset.
Okay, so you're going to want to put these in a box somewhere, your brackets. Put these in a box somewhere, and these are labeled left or right. If you look at the bottom right here, it says L or R. So you'll have your L or R. You can set your glides off to the side in a box. The glides come in a big square box. You can just reest them back in there. And then you have your hardware, and in this little bag of screws, you have two really big ones, and you have to make sure you set these aside because the heads on these really big ones are what hold on, oops, that hold on a front, on an overlay application. It would hold the glide to the front frame, and that head won't fall through that hole. If you use a smaller screw with a smaller head, it's going to pull right through that hole, and you're going to have a problem. So you want to make sure you put your large screw screws, what that one just bounced, you want to put your large screws and your large bin, okay? Those are specifically set aside for mounting those front frames to the glide rail or vice versa.
Then we have all these, which are your small screws, and what these are for is holding these brackets to the rear of the cabinet. You want to use at least three screws for that. So I have two brackets, so in here, I have one, two, three, four. I got one, two, three, four, five, six, seven, eight. Now I have 10 of these. You can put all these in the small screw box there,
and that's used for your rear brackets. And then you have four each. So, I should say, you have four, two for each of these, so there's where four of them go. And then you have three per rear bracket. So these are held on—you're going to watch this in the hardware video—there's a hole there and there. You pull it up against the corner of the drawer box and mount it fast.
Again, four screws for the orange brackets, three each for these brackets, and that should be your sorting. You'll really thank me later when you go to build and everything is just within a hands reach. You know exactly what you need. You're not fishing around for hardware and still ripping open boxes. Everything's nice and orderly in your garage or your workspace. So again, label your cups with a sharpie and put everything away nice and neat in the beginning. You'll thank us later. Thanks for [Music] watching.