In this video Brian shows you how to install your light rail molding. Comment, give us a call, or reach out to your Cabinet Coach with any questions. We hope you enjoy your new cabinets!
Video Transcript
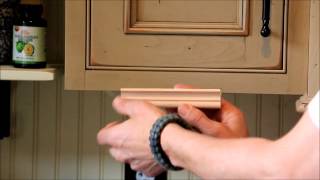
Most kitchens these days use under counter lighting, which is cabinet lighting that mounts up underneath the cabinet, shines down to give you some task lighting as well as it's got a decorative look. Typically, you want to put some kind of a light rail across the bottom of the cabinet. We're going to demonstrate that today using Conestoga’s B11 light rail molding.
A couple of points on this molding. First of all, it's shown upside-down in the catalog. Don't ask me why. We didn't create the catalog but it's shown this way as if you're going to mount it like that, which we don't like. You want to mount it like this. We've got do the installation in a moment, but you want to make sure that you're mounting it with the notch, basically wrapping around the cabinet frame.
A couple of points on that. First of all, if you're doing full overly doors, primarily 1 and 3/8 overlay, the Conestoga’s overlay guide calls for you to hold the door right at the bottom of the cabinet. If you do that and you've got all your doors mounted, you go to put this molding on, this is going to collide with the bottom of the door. Make some intelligent decisions before you put your molding on that if you're doing full overlay, you can adjust the door up and down all you want so hold it up off the bottom of the cabinet by a quarter to 3/8 of an inch. That will give you some room to fit that molding on.
Second point, if you're doing exposed ends or flush-ends, especially with exposed ends but even with flush, like this cabinet is, the cabinet side is just a little bit inside of the side of the front frame. When you put your side piece on, there's going to be a gap back here where the front frame is holding the molding off the side of the cabinet. What we’ve done here, you can barely see it, but what we've done here is just notch the front frame so the edge of the molding can tuck up in there. Now, the molding is going to sit flat to the side of the cabinet the whole way down.
Something you want to do and be mindful of before you get in there and cut all your miters, and say, "Hey, why is this not fitting?" It’s going to be a bigger issue on exposed ends, which is why when you're doing the advantage all plywood box, just order the flush-end option. You'll either will not have to do that at all or much, much less.
Okay, what we've got here to get going is two pre-cut pieces of molding. We're going to make the assumption, you know how to miter a piece of molding with your chop saw. We've got some touch up paint that is a matching color. We went to Lowe's and got some, basically a match to the flat area of the door for this Chesapeake coffee glazed color. All you're going to do is put a little bit of that on your exposed ends. I’m going to use my finger. If you have a brush, that will be better. I'll just put some molding or some paint in there. When you join your moldings together, your two pieces of molding together, that will keep any shadow line from appearing. I'm just going to demonstrate this quickly. Again, just on the edges if you can keep it that way. Get this off my finger before I make a mess.
Typically, you want to install this with a pin gun. You can use a couple of screws up through the bottom. That's going to be an increased risk of splitting the wood. You can get it back off much easier if you put it on wrong, but it's a lot more work to screw that on. We're just going to use the 1 inch pin. It's going to go right up under the bottom of the front frame.
You don’t need to over-nail this, just two or three across will be fine. You can also glue your joints if you want to. Some people put a little dab of glue in there where the paint is not, and you can really get those in there nice. Here's how we're looking. Now, you got to try to find the cabinet side. We'll come back and fuss with that a little bit more in a minute. It's actually pretty tight. Got a little bit of a belly back here with the cabinet side goes in a little bit but I can pin that together in a moment.
But now you’re going to have just this little edge here. Then you’re going to want to get those lined up. If you’ve got a small gauge nailer it’s ideal. You want to put one pin in an inconspicuous area and try to pin those two seams together. Now, you've got a joint you could hardly even see because of the paint we put in there. We've got some worn edges on this so we're not even afraid of scuffing that down or wearing it down with some paint, or some sand paper rather, and kind of making that edge look worn like the doors are. If you don't have that affect in your kitchen, you're going to want to fight pretty hard to make sure your joints are nice and tight.
The light rail molding is not a difficult molding to put on. We do sell several varieties of it. This is the most popular. It’s the one we like the best but we do have the 361 and some other ones. Same basic principle for mounting that molding. Give us a call if you have any questions.
You say to use a 1”pin nail to install light rail molding but what gauge nail?? I am installing Maple light rail
Hey Jennifer, Thank you for your question. We typically recommend using 18 gauge or 23 gauge (pin nailer) when possible to minimize the nail head visibility. For general cabinet assembly, 1″ nails are typically fine to use since there is wood glue that is going to do most of the ‘holding’ work. For trim/molding installation, you’ll likely want to use longer nails, maybe 1-1/2″, just depends on the application. Have a great day!
What did you use to notch out the face frame before installing the light rail? I want to make sure I am not causing damage to the cabinet.
Multiple methods exist, but making the cut with a good, sharp chisel does the trick
Thanks for the video. Will putting this rail molding up stop some of the view of under my cabinets? My contractor installed cabinets but I can see the exposed wood color and corner screws
Hi Jane,
Please contact your Cabinet Joint sales rep to help find solutions for finishing your cabinet bottoms.
We are unable to find your order information to connect you to the right rep. If do not remember who your rep, send us your email address and we would be happy to connect you to your rep.
If you have purchased somewhere else we recommend contacting your supplier for support. Thanks!