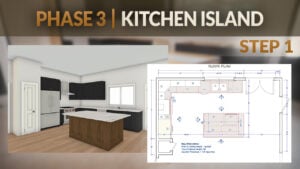
Now that the footprint of your kitchen island is established, it’s time to begin the installation. In Step 2 of our 3-part island series, we walk through the process of setting and installing the island cabinets. We start by identifying the highest point in the room so the cabinets can be properly shimmed and kept level. Following this step-by-step approach helps ensure your island installation is stable, straight, and ready for the final stage.
Video Transcript
Justin:
It's a glorious day here at Cabinet Joint. I'm Justin and today I'm here with Josh, and I see you have a level in your hand. We got a laser set up. What are you using that for?
Josh:
Yeah, so just like the perimeter cabinets, we want to look for the highest elevation of the island and work from there. In this case, it was this corner here. So this is going to be the first cabinet that we decide to put in. It's going to be the easiest one to deal with.
Justin:
So that's always the case then. The highest cabinet is going to be the first on your island.
Josh:
Yeah. Yeah, because that really sets the height precedence for the rest of the install. So, we're not going to go lower than that. It'll only be higher than that. So, this is the first one we're going to work with.
Justin:
Now, Josh, I notice you have placed some things here on the floor. What are these for?
Josh:
Yeah. So, we've got a couple sacrificial wood blocks here. These are going to be cleats for us to hold the island down. Basically, we're going to sleeve the cabinets over these cleats and later come back with a fastener through the sides. Just make it so once this thing's sitting on its footprint, it can't be pushed out of alignment.
And then here we just have the extension for our air duct. This will make it so that the air register, which is in the center of the island, is now brought out to the front to kick, and they can put a decorative grill on the front of that.
So, with these cleats, we've just done the math to figure out—the black line here just represents where the edge of the outside of our cabinet is. So, we want to land on the inside of that cabinet with this cleat. This is spaced in the cabinet wall thickness. That way it can sleeve right over the top of it and we can lock this thing in place.
Justin:
Well, thank you, Josh, for teaching us that. We're going to go and install the island. If you have any questions on how we are installing these cabinets together, you can reference our video where we installed these base cabinets back here, because the process is primarily the exact same. So, let's get to installing these.
Justin:
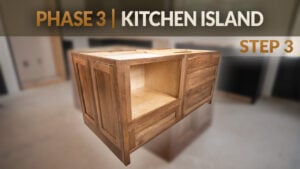
Well, Josh, this island went together pretty quickly. Any key differences than installing your typical base cabinets?
Josh:
Yeah, we just want to make sure we have the same height elevation across the whole thing. We don't want the countertop to teeter-totter on this. So, we did monitor it with our laser and we have the correct shims underneath as we did that side.
We also want to check the face and make sure with the straight edge that we're in a straight line and not curving. Same thing on the back end. We should have the same exact measurement here in width as down there, and that we are planning to be aligned with the countertop on that side of the perimeter cabinets.
Other than that, islands can be one piece or multiple pieces like this. Sometimes they'll have a leg. Really, it can be done in a lot of different ways. You can have a flat side. In the next situation, we're actually going to be doing applied decorative doors on the side with frames. But really, it's very similar to the perimeter cabinets. Same process: monitor height, keep the frame square and parallel, and that's it.
Justin:
Awesome. Yeah, this customer has a lot of storage here in this island. If you have any questions on installing your island, you can reach out to your cabinet coach or call 888-211-6482.
Thank you for watching. Have a great day.