Video Transcript
Introduction
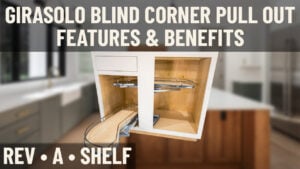
It’s a glorious day here at Cabinet Joint. I’m Justin, and in today’s video I’m going to be showing you how to install a Girasolo blind corner pull out. This pull out comes in 12, 15, and 18 in. Depending on your size, make sure you talk to your cabinet coach to make sure you order the right one. Today, we are going to be using the 12-in model. The instructions, the steps, this tutorial fits for all three of those models. This video is only covering the installation of this pullout. It’s not going to be covering the assembly of this cabinet. We have plenty of videos in our catalog about how to assemble base cabinets like this, so you go there if you need to find out more information on that. This may seem intimidating, but trust me, as long as you follow the correct measurements, follow our instruction, this install will be a breeze.
Tools, Supplies, & Preparation
The tools that you’ll need for this install is an impact with a Phillips head bit, a drill with a 3/32 bit, a pencil, Phillips head screwdriver, as well as some pliers. Now, the hardware has already been installed, but you will also be receiving a box. And in that, there will be screws as well as the mechanisms, the pieces, the shelves themselves, uh, as well as some instructions and some templates. Let’s get into installing this pull out.
A Note About Installation – Inset vs Overlay
Hey guys, post-video Justin here, and I just wanted to say quickly that if you follow the instructions for this video, it will apply only to overlay cabinets. Now, if you’re really observant, you’ll see we did this in an inset cabinet, and that was my mistake. I learned that for an inset cabinet, you’ll need to move the template over an inch and 3/4 into the opening. That means your post bracket should then attach to the back of the center stile without interfering with the opening at all. And then you will need to use some low-profile hinges. The low-profile hinges act the same exact way, but the installation is a little bit different. And then that will allow you to use this blind corner pull out without it rubbing on the hinges or rubbing on the door at all. So, sorry for the confusion, but this should help you out if you have an inset cabinet.
Girasolo Blind Corner Pull-Out Installation
You will begin by opening the box and taking everything out and organizing all of those parts. Once you have everything organized, you will find a set of instructions as well as two templates. This is a cabinet with a face frame, so you can go ahead and use the face frame template. Line it up with the back of the center stile. This pullout here is the 12-in, so I will be lining everything up with that 12-in line. So, I have that lined up with the corner of the stile, and now I’m using a 3/32 bit. I am drilling out those six holes.
Next, I am attaching and putting together the top post bracket. It is labeled F and L here in the instructions if you’re following along with them. And I’m simply putting those two together with the little hook facing out, and then using those two machine screws, attaching the two together. Once I have those attached, I’m moving back inside the cabinet, and I am attaching my post to the bottom of the cabinet using those holes that we’ve already drilled out. I’m going to take the screws that have the washer head and fasten the post down to the bottom of the cabinet, making sure the side with the holes is facing inside the cabinet.
Now that I have the post installed, I’m going to install the pullout mechanisms that the shelves will eventually go on top of. And I’m doing so by loosening the two bolts with a Phillips head bit, then sliding it down to where that bump interacts with the holes that are on the post. Once that bump is inside, I can tighten it by just tightening those two bolts. Once again, once that’s in, everything’s locked in.
On the bottom, I’m going to do the exact same thing and install the top. Now, you have four holes, so you can raise it and lower it depending on your opening. I’m going to put it to the lowest setting since I have a drawer in this cabinet. And then I’m going to do the exact same thing. The bump is inside that hole, and now I am tightening those bolts once again.
Now that the mechanisms are fastened and tightened, I’m going to install the top post bracket by pushing it down onto the post, fastening it to the center stile where we’ve already pre-drilled using those same washer head screws. Then I am going to install that last machine screw. That was just a little bit different than those other two. I’m going to install that here at the top of the post, and that’ll lock everything in.
Now it’s time to get to the shelves, and I will install the top one here first. And to do so, I just move those arms on the mechanism. And the shelves are going to be installed with the straight end going in towards the blind side of the cabinet, and then the little rounder part going in towards the part that you’ll actually see. And to install, all you have to do is put the round peg in the round hole. And I’m going to do the exact same thing here on the bottom.
As I’m doing so, I’m just making sure everything’s working and everything is gliding out and pulling out. Everything is pulling out, and the mechanism is working like it is intended to. So now I am going to lock it in by taking these washers, putting it along the bottom of that round peg, and applying some pressure. And then that’ll lock it into place. If those washers aren’t locking in properly, feel free to use pliers, and use those carefully, and just apply just enough pressure to where those will then go and lock into place.
Now that our shelves are locked in, I am going to take these covers, and I’m going to cover the ugly part of the mechanism there where you see all the bolts and screws. And I am going to simply apply pressure once again on there, and it will snap right into place, covering all that ugly hardware.
The Finished Product & Summary
You can test them. Pull them in and out. Make sure that slide at the end works. Make sure everything fits inside and nothing is rubbing against each other. Seeing that everything is secure, now our Girasolo blind corner pull out is installed.
And that’s all there is to the install of this pull out. It creates a lot of easily accessible storage for you, creates a lot of versatility within your kitchen, and makes the most use out of that corner. And if you’re interested in getting this or you have questions about the installation, make sure you reach out to your cabinet coach, or you can call us at 888-211-6482.
Thank you for watching. Have a great day.