Video Transcript
Justin:
It's a glorious day here at Cabinet Joint. I'm Justin, and today I'm here with Josh, and we are going to be teaching you how to scribe. So Josh, we had a situation here where we were going to put our cabinet in and then there were gaps between the wall and the cabinet side. So how do we resolve that?
Josh:
Yeah. So there was a bulge about midway down. We had about an ⅛" gap at the top, an ⅛" gap at the bottom of the side panel, and then we made contact in the middle. There's a few ways we can do this. This also applies to extended styles, flush toes, baseboards.
If you have a hump in the floor, most houses—even new construction—you’re going to have these issues where the walls aren't perfectly level or they have these kickouts or bulges. And this is really the process to kind of scribe fitting or shaping the side panels or extended styles of your cabinets.
We knew that it was an ⅛" at the top and the bottom. We can gauge that with either an ⅛" washer by putting our pencil in the center of the washer. We can use a scribing tool. We can also freehand it with a pencil by just holding that pencil ⅛" from the wall and tracing all the way down.
We do want to run a piece of masking tape, like some sensitive tape, down the side of the panel for two reasons: so we have a visual line—we can see our pencil line clearly—and also so we don't get any splitting or tear-out during the cutting process.
So Justin, I know you actually made this cut here. What tools did you use to do this? How did you do this?
Justin:
Yeah, so we put it in there and we saw that there was that ⅛" gap. And I have what they call mag shims, but you can cut a piece of wood like you said. You can just use your pencil. And I then put a piece of masking tape. What I did was, using my mag shim and just a knife blade, I cut the tape and just followed the wall.
So what the wall is doing, I'm just making that exact mark here with my knife on that tape. And then I was able to go ahead and peel that tape off. I like doing it that way just because, one, I have a clear line, and two, I know that tape is then going to hold the wood itself as I'm cutting and it's not going to go.
Then as I remove the material, you can really use any tool that removes wood. You can use a sander, you can use a grinder, you can use a jigsaw, circular saw, a track saw—whatever you want to do. I, in this case, used a circular saw, making sure I had a fine new good blade on it. You don't want to use just a rough framing blade because that's going to chip out.
But the biggest thing you'll want to remember as you are scribing is, one, you want to make sure you're careful and follow your line. And two, you want to cut at a slight angle. That way, it makes it easier if, one, you need to sand to make some minute adjustments. And two, as you're putting it against the wall—say you were at an opposite angle—you might still be catching and you're still going to have a gap. But as long as the proud spot of your angle is hitting the wall, everything, all the material behind there, doesn't matter.
That's what I like to do. And I would just sum it up with key things to remember: make sure you're using a good blade or a good piece of sandpaper. I like using tape, make sure you have a good accurate mark, and cut at an angle. And then I think you're set up for success.
Josh:
Yep. Yeah. So, I noticed I saw this space here and it looked like the extended panel went about ¼" past. I assume that is so that we can get the scribing technique down and we have room to do it.
Justin:
Yeah, that's actually a great point.
Josh:
These extended sides allow for scribe room, as well as if the middle of this wall was humped out, say ¼", whatever—it’s not going to affect the install at all. So it's forgiving.
Justin:
Yeah, it's super forgiving. And you only have to worry about then where these sides are actually hitting the wall. So it allows for some scribe space. And that's another important thing too. As you are scribing, make sure your blade isn't too deep or at too steep of an angle that you're not going to end up tearing into the front or the inside of your cabinet.
Josh:
Right.
Justin:
Yeah, so that gap allows for scribe room. And you can see using it, it creates a really clean look. And granted, a toilet's going to be here. Maybe it's not that big of a deal. Maybe this isn't necessary, but my dad always said the bathroom is the most important room in the house because what are you doing? You're looking around. You're judging everything. So we wanted to make this perfect. And that extended side allows us to do so.
Josh:
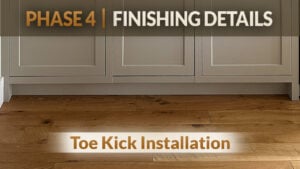
That's great. Yeah, so that's all there is to know about scribing. And just a reminder, this doesn't only apply to your sides. This also applies to your extended styles as well as if you have a flush toe kick. So if you have any questions on scribing methods that we use or methods that we recommend, you can reach out to your cabinet coach or you can call us at 888-211-6482.
Thank you for watching. Have a great day.