Video Transcript
Justin:
It's a glorious day here at Cabinet Joint. I'm Justin. I'm here with Josh. And today we are going to be talking about how to install your vanity or any other single cabinet that you have. Most often you are installing a single cabinet in a situation in a bathroom like here with this vanity. You can also find this in, say, a laundry room, a mud room, or even in your kitchen. You might have a standalone cabinet.
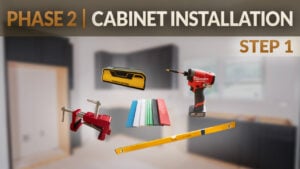
The install goes pretty much the same as we covered with our kitchen series, but it's just a little more simple. Tooling is going to be pretty much the same, except less. So, we have our laser still. We have a level. We have our drill and driver, as well as hole saws, screws, and shims. If you want more information on that, we have a whole video dedicated to what tools you're going to need to install cabinets in the description.
With all that being said, we have this vanity here installed and I'm going to pass it over to the master. Josh, how did we do this?
Josh:
For this install, we knew that we're having a floating flooring put in here. So, we accounted for the thickness and, like in our kitchen series, we attached via staples or nails some 5⁄16" scrap blocks to the bottom four corners of this cabinet. Then, we flipped it back up on its feet. Now we're elevated so that we can slide and have that expansion space for our floating floor.
Also, before we installed this cabinet, we had an end skin to apply. We did that with a contact adhesive, a 3M spray. With specialty species like this—hickory, walnut, white oak—we don't have the flush end option. It'll be a loose end skin that needs to be glued on. So that's easier to do before we install the cabinet. If you install the cabinet tight to the wall, you may not be able to swing that and install that in place, and it becomes a nightmare if you have wet adhesive. So, much easier to do that ahead of time.
This is just like our kitchen install series. Really, the first step is checking the measurement of the cabinet. Make sure it matches the room in the design, so it's going to fit appropriately. We're not going to be too tight against the toilet or anything like that. Once we verified that, we want to find the highest point of the floor, just like anything else, and work from there. So, in this case, we established it was in the back left corner.
We used our laser and kept that running the whole time. If you don't have a laser, you can use a level and strike a line against the wall, against the sidewall. Once we have that kind of set, we just pull our measurements off the sidewalls and from the top mark down to the pipe centers. We transfer those to the cabinets. We drill our holes, ready to put this in.
Once we put it in, we just shim accordingly until we're in line with our laser or our pencil lines on the wall. And once it's good, we'll shim it accordingly in the back and mount it to the wall.
Justin:
And Josh, I noticed back here where the cabinet meets the wall, it looks like it was cut.
Josh:
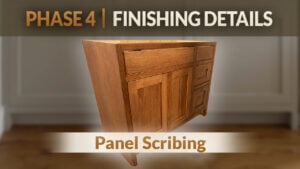
Yeah, there was a bulge in the wall. Because all of our cabinets come with an extended side panel—it's about ¼"—it gives us flexibility to scribe fit to the bulge in the wall. So really, we can do that a few ways. They sell jigs. You can also do it with a washer. You can also freehand it with a pencil.
In this case, it was roughly like an ⅛" gap at the top, an ⅛" gap at the bottom, and then it made contact in the middle. So you could take a pencil and hold it against the wall and just freehand that ride all the way up and down the shape of the wall, and it'll transfer that onto the side of the cabinet. Then you can take a sander, a jigsaw, or a track saw. There's a bunch of ways you can cut it. Finish it off with a piece of sandpaper and you should have a nice finished fit to the wall.
Justin:
Yeah, I can see that achieved a really tight fit here. That looks great. So once you had it in there, you just fastened it.
Josh:
Yeah. So once that was tight to the wall, we just put the proper shimming behind this, made sure we were level with our laser, marked our studs, and went directly through those studs with the shims behind it.
Justin:
Well, thank you, Josh, for teaching and showing us how to install a vanity cabinet. If you have any questions on how to install your vanity cabinet, how to design your vanity cabinet, anything like that, feel free to reach out to your cabinet coach or you can call us at 888-211-6482.
Thank you for watching. Have a great day.