Video Transcript
Introduction
It's a glorious day here at Cabinet Joint.
I'm Justin, and in today's video, I'm going to be showing you how to install a pocket door.
This video does not cover the assembly of this cabinet that you see here. We have other videos in our description if you want to see how to assemble the actual cabinet. This is just going to skip that process and head right to installing the pocket door.
The pocket door you will most commonly find on top of a countertop. And what you'll see is people put their coffee makers in here, their blenders in here. And the reason they like doing this is they can stick it in here and then they can go slide that door back — and now they don't lose any counter space and they still have room to put their ingredients as they're grabbing them. It just creates a lot of flexibility and is effective for your space.
This door, as you can see here, slides back, opens up, and then closes just like any other door.
One thing to keep in mind before you get this is that if your opening and your door are a lot wider than the depth of your cabinet, it will end up sticking out of the front. So, you see here I have about 4 inches of space sticking out. But if, say, this opening was another 4 inches wider, then all of a sudden I’d have eight. So that's something to keep in mind and something you need to talk to your cabinet coach about to make sure it's the right option for you.
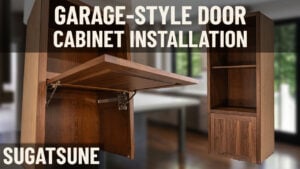
There's also a top option that opens up like a garage door, where it folds up on the top and then slides back. This customer opted for the sideways version because the opening from left to right (widthwise) is smaller than top to bottom. So that meant the door would stick out less from the front.
In terms of customization, this system can be installed with practically any size door, but there are weight restrictions. So if you have an extra-large door, it's not going to work because it'll be too heavy. And, like I said, with the protrusion of the front, you just want to make sure your opening isn't a lot larger than the depth of your cabinet.
The slides themselves are 24 inches max, and the slides we're using today come in 18 inches. Those come in increments of three.
Your cabinet can—and maybe should—be deeper than the slides that you have. The reason being is that allows your door to slide all the way back in without being in the front on your countertop. So, in an ideal world, you want your cabinet that's sitting on your countertop or on your bar top, or wherever it might be, to be as deep as possible for installing these pocket doors.
The assembly for this is really easy. You just have to follow the measurements and the step-by-step process that we have. There are instructions that will come in the kit as well. Those are helpful, but we found just a couple of different things that you'll see as we instruct you in installing this.
With all of that being said, we can head into what tools we're going to need for this assembly.
Tools, Supplies, & Preparation
The tools and supplies that you're going to need to install your pocket door are:
A knife
Pencil
Tape measure
Speed square
The Cabinet Joint inset jig (that we'll use for door stops)
A Posidrive screwdriver (you can also use a Phillips head)
Screws — here we supplied screws that are 1 and 3/16 inches long so they won’t protrude from the outside of our cabinet
An impact driver with a Phillips head bit
An impact driver with a T20 bit for those supplied screws
A drill with a 3/32 drill bit for the door stop
A 1 and 3/8 Forstner bit
A self-centering bit
On screen here, you'll see the hardware kit that will be included. This includes all the hardware that you're going to need to install your pocket door.
And then lastly, you're going to need to provide some 3/4-inch plywood as well as a 1/2-inch plywood strip, which you might have extra from your job, or you might need to run to the store and grab some.
With all of that being said, let's get into installing the pocket door.
Side Pocket Door Installation
The first thing you'll want to do is take your bag of hardware. You will find two sets of slides, two hinges, two black plastic rollers, as well as screws to install everything. Once you have all of those pieces organized, you can take your door, which won't come hinged.
For this door, for this hardware, we will be measuring one inch from the side of the cabinet and 1 and 5/8 inches from the top and the bottom.
We do have a video on drilling out hinge bores, and it will be in the description, but these measurements will be a little bit different than the ones in that video. Once you have that marked out, you can take a nail — I have a punch — and just make a little dimple. It'll make your life a lot easier as you drill.
Then, using a 1 and 3/8 Forstner bit, drill out that hinge bore. I like to go pretty much as deep as the head of the Forstner bit. Then, I will take my hinge and just double-check to make sure I drilled deep enough. Just be careful that you don't protrude through the front.
Once you have those in, you can take your hinges and square them up. Use a self-centering bit, drill the holes, and screw that into your door.
Now we need to make a spreader strip for the slides. You will take at least a 1/2-inch strip of plywood and you'll want to cut it to length. Go to your door, measure from center to center of your hinges, and then subtract two inches. So, in this scenario, my center-to-center was 19 and 5/8, and so I cut my stretcher 17 and 5/8.
I'm going to install it on those slides, and you can see there's a bit of an L bracket here. I am lining up my stretcher with the edges of those brackets, as you can see here. And then I am just screwing — no need to pre-drill. This is raw plywood. You're good; you won't split it.
Taking the screw with a spherical head, I'm screwing those brackets onto my spreader strip.
Now, I'm going to go to my cabinet. You will need a piece of 3/4-inch plywood that will fit the inside of your cabinet opening here. Once again, I had an extra piece lying around. You can talk to your cabinet coach, you can use shelf material, or you can run to your local hardware store.
Then just take your measurements of the inside of your opening. Make sure your screws aren't too long that they are going to protrude out the side. I'm using 1 and 3/16-inch screws because I have 3/4-inch material and 1/2-inch material on the outside. That gives me a perfect measurement for my screw.
Now you can begin to install your glides.
To install your glides, you are going to measure 1 and 3/32 inches up from the bottom, and you are going to do so in the front and the back. Once you have those marked out, you are going to take your bottom slide and flush it up with the back of the face frame, and then line up the center of those screw holes with your line that you just made.
You're going to screw into the elongated horizontal hole. This allows you to have some adjustment forward and backward if you need. So, I'm going to put in the screw in the front, and then I'm going to do the exact same on the back — once again centering the screw holes on that mark that you just made.
Now, I'm going to move over to the top, and I'm going to slide my glide to where that spacer is going to keep our glides parallel. So, I'm going to go up to the top, take the top glide, and once again flush it up to the back of the front frame. Put in that screw in that elongated hole, then shift the glides back, keeping it parallel, and put a screw in that last hole there.
Now we have our glides attached. We can go and install our door.
Install your door like you do with any other inset hinge. You will apply pressure, get those hooks on those bars, and apply pressure — and then that will simply click right into place. I'm going to click the top and then the bottom.
Now my door is on, and I'm going to close it, make sure everything fits. I'm going to slide it back and make sure everything fits.
It looks like I need to adjust it. So, using the three screws that are on your hinge, I can adjust up, down, left, right, forward, and backward. Once I have put my door in and adjusted it and I know it fits, I'm going to put in four more screws into those glides to lock everything into place.
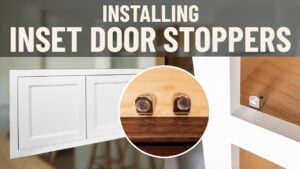
I have my door installed and adjusted how I like it. I need to now put in a door stop, which we have another video for in the description.
The last step is to install that black plastic roller, but this is an open-bottom cabinet because it's going on a countertop. So, I can't install it now. I need to wait, and then they'll install it into their counter. That essentially helps your door as it glides back — it doesn’t allow it to bow or bend, and gives it a little more rigidity.
The Finished Product & Summary
Those are all the steps, and now you have installed your pocket door. You have the ability to slide it back in and hide the door, or have it open or closed as you would with any other regular door.
Now your pocket door is installed, and you have all the accessibility that it provides to put all of your appliances in there and keep all of the counter space available to use.
As you're installing this, keep in mind your door will be potentially bigger or smaller, so some of those measurements may change — but as long as you follow the instructions, the entire install process will be the exact same.
If you have any other questions about installation or whether this is the right solution for you, feel free to reach out to your cabinet coach or call us at 888-211-6482.
Thank you for watching. Have a great day.