Here is how the process works...
-
1Plan

Read the planning tips page
The planning tips page has tons of helpful information to assist you in measuring your kitchen, planning the space, laying out your cabinets and avoiding costly layout errors. View it now. You can always return to this page later when you are ready to continue the process. NOTE: If you already have a cabinet plan from another vendor, you may simply send that! Just skip right to step 4 below!
Take your field dimensions
A proper kitchen plan starts with good dimensions. Take your time measuring your kitchen walls, distances to obstacles and obstructions like windows or doorways, etc.
Learn moreSome key points when you are measuring your space:
- Measure each wall length from inside the corner where walls meet
- Be sure to determine your exact ceiling heights, don’t assume exact 8’ or 9’ ceiling heights!
- Measure distances to obstacles such as doors and windows. Remember, doors and windows will have trim, so account for the trim width so your cabinets and counter tops do not interfere with the trim!
- Measure to your plumbing centers, appliance locations/wiring, etc and ensure your cabinet plan correctly accounts for them.
- If planning on an island or peninsula, be sure to leave adequate isle space. National Kitchen and Bath Association recommends 42” isles if possible.
- Once all measurements are taken, place the appliances on the drawing in their correct spaces. Remember, dishwashers are always 24” wide and sit between cabinets. Most common fridge sizes today are 36”
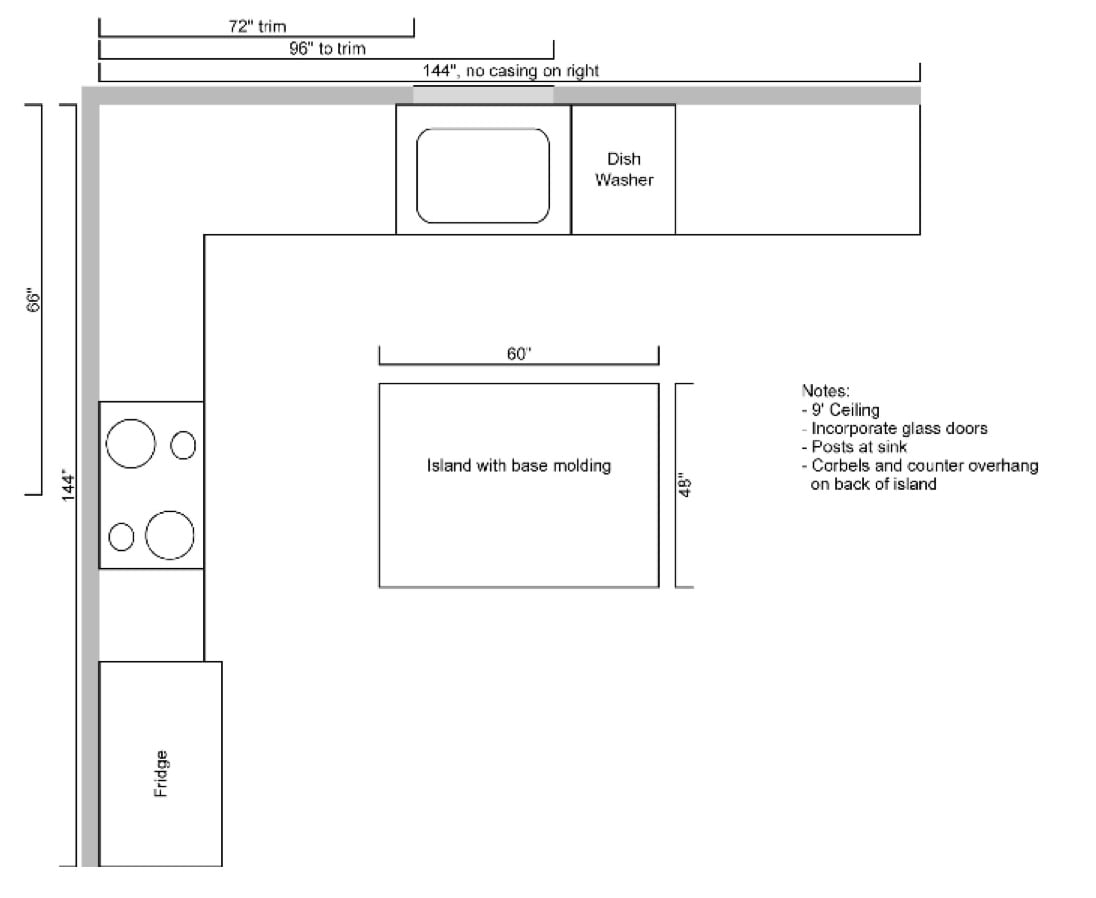
Below is an example of how a properly measured kitchen would look. Check out our planning tips page as well…

-
2Prepare & Submit
Create a drawing
Your drawing can be as simple or complex as you wish. There is no need for CAD software or any design experience. All we really need is a top down view of the kitchen with each of the cabinets/sizes clearly labeled.
Learn moreNow that you have your space measured, its time to populate the space with cabinets! Here are some tips and requirements:
- We need to have an actual cabinet layout, not just the field dimensions. If you are unable to provide a cabinet plan you may be a better candidate for working with our designer to create a cabinet plan for you (there is a fee)
- While drawings of each elevation are helpful, they are not required. We really just need a top down view of the kitchen with each cabinet labeled clearly (IE: W1242 would be a Wall cabinet 12 x 42).
- Ideally, we would need the cabinets labeled in our nomenclature. If our nomenclature is not used, we will do our best to interpret what you are looking for, but please realize this increases the risk of error.
- Be sure to plan the uppers and lowers together so that you correctly ‘center’ bases under their respective wall cabinets. For example, you want to make sure your cooktop centers under your range hood/cabinet.
- Be sure to leave room for fillers (or even better, the ‘Extended Stile’ option) where cabinets meet walls. A rule of thumb on overlay cabinets is an 1” of filler/extended stile is required for doors to open cleanly. Partial overlay and inset cabinets are less critical in this regard, but still advisable so that you have some ‘fudge factor’ in your installation.
- Don’t forget to call out crown profiles and other trim or accessories like roll out trays or trash cans.
- If requesting appliance panels, we need the actual panel sizes (don’t send the entire spec package for your appliances, just locate the appliance panel size the manufacturer requires and send that to us).
Remember, the intent here is just to get you a budgetary price to see if there is a reason to continue the process. Don’t get frustrated feeling like every detail needs to be planned out now, just focus on the main cabinets and options. We can work out the details together as the process continues!
Submit your drawing via email or fax
If you wish to email your drawing once ready, you may click the ‘get started’ button at the bottom of this page where you will be directed to page where you can provide necessary information and attach your drawings. If you wish to fax your drawing, you may fax it to 704-662-8898.
Learn moreNow that we have a drawing from you, we need some details to ensure we are getting the quote as accurate as possible. Remember, if you don’t tell us what you want, we are left to assume things on your behalf and these assumptions are taken as accurate unless you tell us otherwise. Take your time and learn as much as you can about our cabinets so you can provide the information needed! In order to quote your project, we will need:
- Contact info including shipping address: We cannot call you with questions or quote your shipping costs without this information! You are not put on a mailing list.
- Cabinet construction: All plywood Advantage line or Particleboard Essence line? Essence particleboard cabinets will save you about 8% on a typical job. The Advantage plywood cabinets have a real wood veneered interior and an optional solid wood shelf.
- Door overlay: Overlay pertains to how much of the cabinet face is covered by the door/drawer front. Partial overlay results in lots of cabinet showing around door while full overlay has very little cabinet showing around door. Conestoga also offers inset cabinets: flush inset results in the door inside an flush with face frame. Beaded inset is where the door is inside and flush with frame AND there is a delicate bead routed in the face frame where door meets frame. Inset adds about 5% to the job, but adds significantly more assembly time for you as the up fit of the doors and drawer front and the installation of the hardware is much more time consuming.
- Drawer glide: Full extension soft close under mount or builder grade white painted side mount? Note, full extension soft close is mandatory on inset cabinets.
- Hinge: Full Blum premium soft close or Ferrari builder grade (both are concealed cup hinges)? Note that Blum premium hinges are the only available hinge on Inset cabinets.
- Wood Specie: Conestoga offers pretty much anything you may need, but check the woods and finishes section
- Finish: Do you want stained or painted cabinets? Do you want a glaze option? Maybe you want unfinished cabinets at a 20-30% savings? We don’t need a color at this point, just an idea of the type of finish you think you want. We can work with you later on to define a color and get you samples.
- Door Style: A door design from our doors section is ideal, but if not, just get us close…Shaker? Standard Raised Panel? Mitered? Cathedral door? Even a rough description will help us narrow it down for you for quoting purposes, or just pick one from our web site Note: We will assume edge/bead/panel door profiles unless supplied by you!
- Drawer front Style: Would you prefer a ‘matching’ front where it matches the door style or a single piece ‘slab’ drawer with an edge profile (slab drawer saves money)? Profiles(s)will match doors above.
- A basic idea of wish list: Glass doors (glass not included, just prepared to receive yours)? Crown molding? If so, what profile? Panels for backs of island? Roll outs and interior storage items? These and many more such options are ideally called out on the drawing, but at the very least listed in the email you send us. If any of the items you ask for are not available in the Conestoga line, we will let you know when we send the quote back to you. Feel free to navigate our offering by using the pull down menus at the top of the web site where you can take a look at interior storage items, pots, carvings, moldings and more.
-
3Review & Edit
Quote is sent to customer
Once you have completed the steps above, someone from our sales department will quote your project for you. Keep in mind, this quote will just be a starting point and its intent is to act as a catalyst for further discussion and planning with you once you determine if the project is in your budget.
Customer submits edits
Once you have taken time to review the quote, you may submit edits as much as you like. Every time we have to enter your quote to make edits, there is a risk of error as many changes will affect other aspects of the job. This in mind, we strongly suggest you carefully work through your quote/drawings and make as few edits as possible.
The quote is reviewed in an online meeting
We use ‘JoinMe’ to initiate a screen sharing session, where all parties will be looking at our computer screen. On screen will be your quote and your drawing. We will work through them together, ensuring all the cabinets/accessories are correct. This is a critical step to ensuring your quote is accurate and that all your questions are answered. We can even illustrate things on screen or navigate to helpful web pages to illustrate critical points.
-
4Finalize
Quote is signed off on and payment is made
This step is only done once you are 100% clear on your order and all selections have been made. We cannot place orders into production that still have open questions such as door style or color. EVERY aspect of the order must be clear and accurate before it is placed. Payment is 100% prepay, as the products Conestoga makes are 100% custom and cannot be restocked.
Order goes in to production
Once we receive the payment, the order goes in to the next production cycle, typically the next business day. Lead times for finished products are generally 15-17 business days, not including shipping times. A ship date is issued normally within 2-3 business days of order placement.