 It is often said that even the nicest cabinets can look ‘cheap’ if installed improperly. To maintain the high end look and feel of your new kitchen, the cabinets should be installed with care and skill.
We have outlined a basic workflow and some helpful tips when installing. Of course the actual process varies from project to project, but these tips should assist you in understanding how your cabinets are best installed.
Required Tools
Some tools you may want to buy or rent include:
|
|
While this list is not exhaustive, it gives you a good idea of what is going to be required to install your cabinets. Please note that none of the hardware needed to install the cabinets is included with your order.
Tips Before You Begin
- The key to a great installation is planning. A good installer spends hours marking studs, striking cabinet lines on the wall, determining the high and low points in the floor/ceiling, ensuring electrical outlet placement is correct, removing trim that will be in the way of new cabinets, etc.
- Make sure you determine the top of the base cabinet from the HIGH point in the kitchen floor. This is covered in more detail below, but it’s a critical point.
- Take into consideration final household trim locations. Be sure you know the width of the casing and base being used in the house so that you can allow for enough clearance with the cabinets.
- Have exact appliance and sink specifications in hand before installing appliance cabinets or trimming openings to allow for appliance cabinets.
- For any cabinets that need to have openings trimmed to fit appliances such as built ovens, we suggest you trim those before installing as the cabinet can be more easily trimmed when lying on its back.
- Most homeowners will not have an impact type screwdriver. Therefore, we strongly suggest that all wood to wood screwing be pre-drilled to avoid wood splitting. This is not necessary for the install screws that hold the cabinets to the wall. Only the cabinet-to-cabinet screws into solid wood will require this. Additionally, we suggest that you lubricate the screws with paraffin wax or soap in order to ensure the screw heads do not snap off due to excessive torque being placed on them.
Preparing to Install
- Start by thoroughly cleaning the entire work site. Sweep the floors and remove any items, tools, or materials that are going to be in your way. Nothing is more unsafe, frustrating or inefficient than a sloppy work area.
- Begin by finding and marking every stud and then striking a vertical line on the wall at each stud location. A stud finder is a great tool for this.
- If possible, mark any ‘in the wall’ piping or other obstacles you do not want to screw into when installing cabinets. This includes plumbing lines that feed the upstairs bathrooms, HVAC ducting, etc.
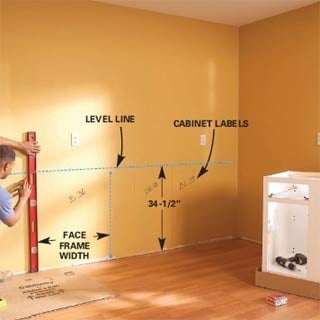
- Next, mark all the cabinets on wall with a heavy line. Start in the corners and work outward, marking the side of each cabinet, filler, post or panel. In this way, you will be ensuring that the layout fits and there are no issues. You do not want to have 5 cabinets installed before you realize there is an issue! Be sure to mark each cabinet name on the wall in the space that it will occupy (B12, W3030, etc).
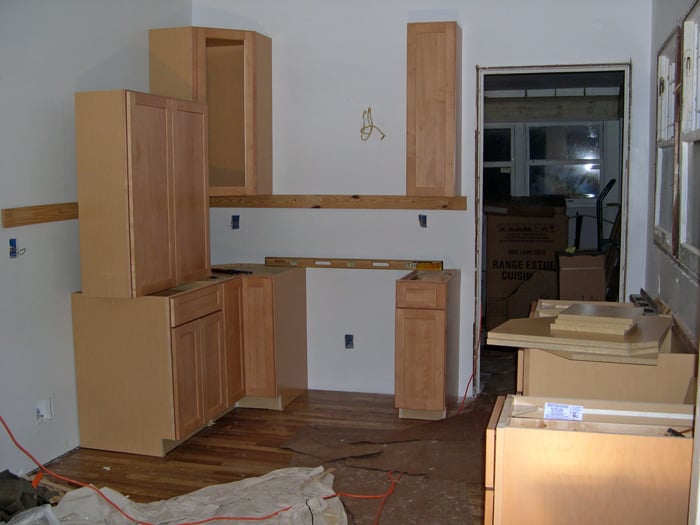
-

This figure shows what your prepared installation area should look like. Now, strike a level line all around the room where the top of the base cabinets will be (34-1/2” off the ground). This is best done with a spinning laser level, but you can also do this with a standard tape measure and level. The trick is, find the HIGHEST point in the floor (no floor is dead level) and then measure up 34.5” from that point. That line now drives the location of the top of every base cabinet. Make a level line all around the room wherever cabinets are to be installed. Double check with your tape that in no area is the line less than 34.5” off the floor. If you find there is, that becomes your new high spot. Re-mark a new level line around the room. If the ‘high point rule’ is not observed, you will find that you will need to cut the bottoms off many cabinets to make them ‘shorter’ in order to honor the level line. By choosing the high point, you enable the cabinets sitting in the lower section of flooring to be shimmed off the floor, a much easier process to control and a much easier installation in the end. Also, you do not end up with cabinets that are lower than standard (which can lead to back fatigue when working in the kitchen).
Installing Your Base Cabinets
- You should now be ready to install your cabinets. Use a 3” sturdy wood screw to hold cabinets to the wall. Use a 2-3/8” wood screw (preferably self tapping) to screw cabinets to each other through the face frame. You may want to pre-drill and counter sink your holes to avoid the wood splitting and your screw heads from showing (use clamps as described below to hold the cabinets tight together while you install the screws).
- Remove the doors and drawer fronts from the cabinets you are installing. You can’t adequately clamp the cabinets together if the doors and drawer fronts are still on them.
- Install your base and tall cabinets first. We like this method because it allows you to get your counters templated at the beginning of the installation process instead of at the end, saving you several days in your project schedule. It also helps for one and two man installations as the base cabinets can be used as a work table while trying to install the upper cabinets.
- Start in the corners and install your blind or easy reach cabinets. Work out towards the ends of the run, being careful to install fillers and panels per you plan. Be sure to check and make sure the upper cabinets will lay out correctly based on the locations of your base cabinets/fillers.
- Be careful when marking and cutting/drilling for plumbing in sink cabinets. If you are not paying attention, it is easy to reverse the dimensions (if you are marking on the cabinet back) or to forget to account for cabinet wall thicknesses, etc. Measure twice, cut once!
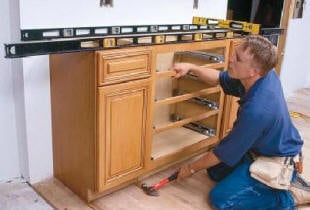
-

Place your long level across the face frames and make sure that there are no dips or humps that will affect the counter top template. As you move along the run of cabinets, use shims under the cabinets to level them left to right and fore to aft. Also use the shims behind cabinets to get them straight across the face. To determine if they are straight, place your long level across the face frames and make sure that there are no dips or humps that will affect the counter top template. See image.
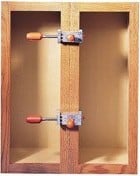
- As you connect and screw the cabinets together, use the clamps to tightly clamp the cabinet face frames, ensuring they are flush with each other as well. See image below…

Use the clamps to tightly clamp the cabinet face frames Where a cabinet meets the wall, you may find that the filler needs to be scribed to fit against the wall and this will usually result in an irregular cut with your jig saw. We find a more helpful way to handle this is to rip the filler with your table saw to the width of the widest point in the gap between cabinet and wall. Make the rip cut at a 22.5 degree back angle. Then, scribe the filler to the wall contour with a pencil Use your block plane or a belt sander to plane down the filler in the offending high spots. Because the filler has a sharp edge, it will plane very quickly and result in a more exacting fit than might be achieved with a jig saw.
You should now be done with your base and tall cabinet installation. You can now contact your counter top contractor and alert them that you are ready for template. Before moving on, remember that the counter top company will expect the cabinets to be level to within 1/8” over 8’. If this is not done, there will be excessive shimming of the counter tops and, if granite, you risk the counter cracking due to the voids/humps under the counter top.
Installing Your Wall Cabinets
- As with the base cabinets, start in the corners and work outward. You want to maintain 18” between the top of the counter (yet to be installed) and the bottom of the wall cabinets. Most granite counters are 3 CM (about 1-1/4”) so it is typical to maintain 19-1/4” between the top of the base cabinet and bottom of wall cabinet. If installing laminate counters, allow 19-1/2”. If you have tall cabinets, they will drive the location of the upper cabinets as you will want to keep the tops at the same elevation.
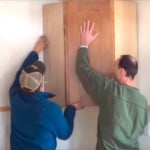
-

Strike a level line and then screw the long straight material to the wall so that your wall cabinets can set on it while you screw them to the wall. Once the location for the bottom of the wall cabinets is found, strike a level line and then screw the long straight material to the wall so that your wall cabinets can set on it while you screw them to the wall. This small step is not required, but is critical to your installation if you are installing the cabinets by yourself. See image.
- Be sure to hang the wall cabinets with the door swing in your desired position. Wall cabinets can be flipped either way, so single door wall cabinets can be left or right depending on how you have the cabinet flipped.
- Ensure your wall cabinets and base cabinets ‘center’ on each other. For instance, if you are not careful with your measurements on fillers, etc, you could have a situation where the wall cabinet that is supposed to center over the stove with the Microwave below it is not centered over the opening the stove is meant to slide in to. This is where the actual cabinet marks on the wall in the beginning of the process are so critical.
- Once all your wall cabinets are installed, you can install all your doors and drawer fronts once again. Then, move on to toe kick and trim. This is a topic too broad to cover in this instructional, but it is safe to say that the trim job can make or break the kitchen. If you have any question on your ability to adequately trim the kitchen, you may want to consider hiring a professional trim carpenter or handyman.
We hope this helps you understand the process of installation and leads to the avoidance of some common pitfalls with cabinet installation. If you have any specific questions, please feel free to contact us. We install hundreds of kitchens a year and we’d be happy to answer your questions and guide you to the perfect installation!